CIA Hive Beacon Infrastructure复现1——使用Apache mod_rewrite实现http流量分发
0x00 前言
2017年11月9日维基解密公布一个代号为Vault8的文档,包含服务器远程控制工具Hive的源代码和开发文档。开发文档中的框架图显示Hive支持流量分发功能,若流量有效,转发至Honeycomb服务器,若流量存在问题,转发至Cover Server。 本文仅站在技术研究的角度,尝试使用Apache的mod_rewrite模块实现http流量分发,完成相同的目标。
标记后的框架图如下:

之前的分析文章:
0x01 简介
本文将要介绍以下内容:
- Windows系统下安装配置Apache mod_rewrite
- Ubuntu系统下安装配置Apache mod_rewrite
- 规则配置技巧与实例
- 根据判定条件实现http流量分发
0x02 Windows系统下安装配置Apache mod_rewrite
1、下载Apache
地址:
http://httpd.apache.org/download.cgi
选择需要的版本,测试版本Apache 2.4.33,下载地址:
https://www.apachehaus.com/cgi-bin/download.plx?dli=wUWZ1allWW00kej9iUG5UeJVlUGRVYRdnWzQmW
2、安装
解压后通过命令行安装:
cd \Apace24\bin
httpd -k install
3、开启mod_rewrite模块
编辑文件: \Apace24\conf\httpd.conf
找到#LoadModule rewrite_module modules/mod_rewrite.so,去掉#
4、开启支持.htaccess文件
编辑文件: \Apace24\conf\httpd.conf
定位如下位置:
DocumentRoot "${SRVROOT}/htdocs"
<Directory "${SRVROOT}/htdocs">
    #
    # Possible values for the Options directive are "None", "All",
    # or any combination of:
    #   Indexes Includes FollowSymLinks SymLinksifOwnerMatch ExecCGI MultiViews
    #
    # Note that "MultiViews" must be named *explicitly* --- "Options All"
    # doesn't give it to you.
    #
    # The Options directive is both complicated and important.  Please see
    # http://httpd.apache.org/docs/2.4/mod/core.html#options
    # for more information.
    #
    Options Indexes FollowSymLinks

    #
    # AllowOverride controls what directives may be placed in .htaccess files.
    # It can be "All", "None", or any combination of the keywords:
    #   Options FileInfo AuthConfig Limit
    #
    AllowOverride All

    #
    # Controls who can get stuff from this server.
    #
    Require all granted
</Directory>
AllowOverride None改为AllowOverride All
5、编写.htaccess文件,配置规则
保存路径为\Apace24\htdocs\
测试规则为将1.html重定向到2.html,具体内容如下:
<IfModule mod_rewrite.c>
RewriteEngine on
RewriteRule 1.html 2.html
</IfModule>
使用记事本打开,另存为文件,文件名为".htaccess"
注:
文件名包含引号",如下图

2.html保存在\Apace24\htdocs\,内容如下:
<html>
<body>
True page
</body>
</html>
6、开启apache服务
httpd.exe -k start
7、测试
访问http://127.0.0.1/1.html
返回内容True page,代表网页被重定向到了2.html
8、补充
apache的日志路径为\Apache24\logs
mod_rewrite的日志保存在error.log
文件\Apace24\conf\httpd.conf可指定日志记录等级
0x03 Ubuntu系统下安装配置Apache mod_rewrite
1、下载安装
sudo apt-get install apache2
2、开启mod_rewrite模块
sudo a2enmod rewrite
3、开启支持.htaccess文件
编辑文件: /etc/apache2/apache2.conf
定位如下位置:
<Directory /var/www/>
        Options Indexes FollowSymLinks
        AllowOverride None
        Require all granted
</Directory>
AllowOverride None改为AllowOverride All
4、编写.htaccess文件,配置规则
保存路径为\var\www\html\
测试规则为将1.html重定向到2.html,具体内容如下:
<IfModule mod_rewrite.c>
RewriteEngine on
RewriteRule 1.html 2.html
</IfModule>
2.html保存在\var\www\html\,内容如下:
<html>
<body>
True page
</body>
</html>
5、开启apache服务
sudo /etc/init.d/apache2 restart
6、测试
访问http:/IP/1.html
返回内容True page,代表网页被重定向到了2.html
7、补充
apache的日志路径为/var/log/apache2/
mod_rewrite的日志保存在error.log
文件/etc/apache2/apache2.conf可指定日志记录等级
0x04 规则配置技巧与实例
1、将所有网页重定向至 https://www.baidu.com
.htaccess文件内容如下:
<IfModule mod_rewrite.c>
RewriteEngine on
RewriteRule . https://www.baidu.com
</IfModule>
2、过滤Request Header
(1) User Agent
只针对特定User Agent的请求进行重定向
实例:
使用Mac下的Safari浏览器访问1.html,将其重定向到2.html
.htaccess文件内容如下:
<IfModule mod_rewrite.c>
RewriteEngine on
RewriteCond "%{HTTP_USER_AGENT}" "Macintosh; Intel Mac OS X 10_9_3" [NC]
RewriteRule 1.html 2.html
</IfModule>
参数说明:
RewriteCond "%{HTTP_USER_AGENT}" "Macintosh; Intel Mac OS X 10_9_3" [NC]代表判定条件,判断HTTP_USER_AGENT是否包含字符串"Macintosh; Intel Mac OS X 10_9_3"(大小写不敏感)
NC: 字符比较,大小写不敏感
详细参数说明可参考:
https://httpd.apache.org/docs/current/mod/mod_rewrite.html#rewritecond
1.使用curl进行测试
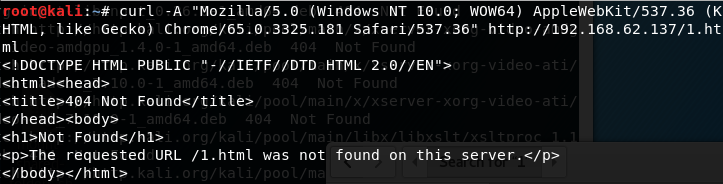
模拟Chrome浏览器:
curl -A "Mozilla/5.0 (Windows NT 10.0; WOW64) AppleWebKit/537.36 (KHTML, like Gecko) Chrome/65.0.3325.181 Safari/537.36" http://192.168.62.137/1.html
并没重定向,如下图
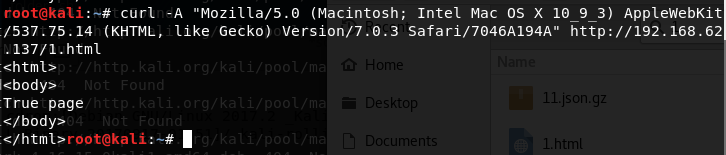
模拟Mac Safari浏览器:
curl -A "Mozilla/5.0 (Macintosh; Intel Mac OS X 10_9_3) AppleWebKit/537.75.14 (KHTML, like Gecko) Version/7.0.3 Safari/7046A194A" http://192.168.62.137/1.html
网页重定向,获得2.html的内容,如下图
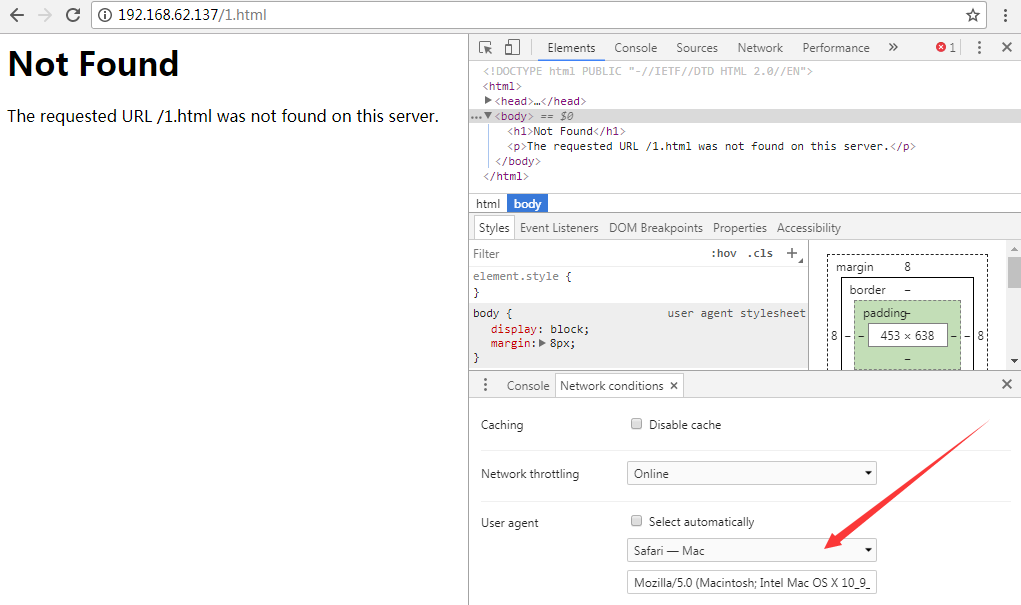
2.Chrome浏览器修改User Agent的方法
访问页面,F12 -> More tools -> Network conditions,选择User agent 为 Safari —— Mac
如下图
(2) Peferer
只针对特定来源的请求进行重定向
实例:
如果来源为test.com,访问1.html时将其重定向到2.html
<IfModule mod_rewrite.c>
RewriteEngine on
RewriteCond "%{HTTP_REFERER}" "test.com" [NC]
RewriteRule 1.html 2.html
</IfModule>
使用curl进行测试:
curl -e "test.com" http://192.168.62.137/1.html
(3) 其他可供选择的过滤条件
如下图
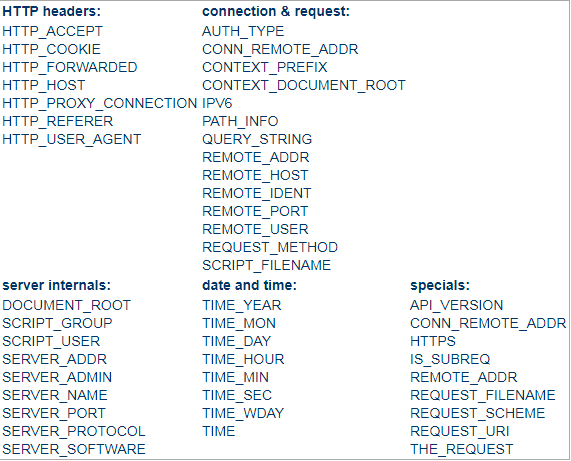
注:
图片来源于https://httpd.apache.org/docs/current/mod/mod_rewrite.html#rewritecond
补充:
Jeff Dimmock在他的博客分享了使用mod_rewrite配置规则的心得,值得学习,地址如下:
https://bluescreenofjeff.com/tags
0x05 小结
本文介绍了Windows系统和Ubuntu系统下安装配置Apache mod_rewrite的方法,分享配置技巧与实例,在技术研究的角度实现了根据请求条件进行http流量分发。
下篇文章将要介绍https的流量分发实现。