Horde Groupware Webmail漏洞调试环境搭建
0x00 前言
本文记录从零开始搭建Horde Groupware Webmail漏洞调试环境的细节。
0x01 简介
本文将要介绍以下内容:
- Horde Groupware Webmail安装
- Horde Groupware Webmail漏洞调试环境配置
- 常用知识
0x02 Horde Groupware Webmail安装
参考资料:
https://www.horde.org/apps/webmail/docs/INSTALL
https://github.com/horde/base/blob/master/doc/INSTALL.rst
https://geekrewind.com/install-horde-groupware-webmail-on-ubuntu-16-04-18-04-with-apache2/
https://neoserver.site/help/step-step-installation-instructions-postfix-and-dovecot-ubuntu
简单来说,安装Horde Groupware Webmail时需要配置以下环境:
- MySQL数据库
- Apache2
- php7.2
- Dovecot
操作系统选择Ubuntu18,这里不能选择Ubuntu16,因为Ubuntu16不支持php7.2
本文的安装过程做了适当精简,完整过程可根据参考资料进行学习,具体安装过程如下:
1.安装MariaDB Database Server
(1)安装
安装命令:sudo apt-get -y install mariadb-server mariadb-client
(2)配置
配置命令:sudo mysql_secure_installation
配置如下:
Enter current password for root (enter for none): press the Enter
Set root password? [Y/n]: n
Remove anonymous users? [Y/n]: Y
Disallow root login remotely? [Y/n]: Y
Remove test database and access to it? [Y/n]:  Y
Reload privilege tables now? [Y/n]:  Y
(3)创建数据库
连接数据库的命令:mysql -u root -p
执行以下命令:
CREATE DATABASE horde;
CREATE USER 'hordeuser'@'localhost' IDENTIFIED BY 'new_password_here';
GRANT ALL ON horde.* TO 'hordeuser'@'localhost' WITH GRANT OPTION;
FLUSH PRIVILEGES;
EXIT;
设置数据库的用户为hordeuser,口令为new_password_here
2.安装php-horde-webmail
安装命令:sudo apt -y install php-horde-webmail
3.配置webmail
安装命令:
pear channel-discover pear.horde.org
pear run-scripts horde/horde_role
配置如下:
Filesystem location for the base Horde application : /usr/share/horde
Configuration successfully saved to PEAR config.
Install scripts complete
注:
这里必须指定为/usr/share/horde,否则在运行webmail-install时报错提示:failed to open stream: No such file or directory in /usr/bin/webmail-install on line 17
4.安装
安装命令:webmail-install
配置如下:
Installing Horde Groupware Webmail Edition

Configuring database settings

What database backend should we use?
    (false) [None]
    (mysql) MySQL / PDO
    (mysqli) MySQL (mysqli)
    (oci8) Oracle
    (pgsql) PostgreSQL
    (sqlite) SQLite

Type your choice []: mysql

Username to connect to the database as* [] hordeuser
Password to connect with new_password_here
How should we connect to the database?
    (unix) UNIX Sockets
    (tcp) TCP/IP

Type your choice [unix]: unix

Location of UNIX socket []

Database name to use* [] horde

Internally used charset* [utf-8]
Use SSL to connect to the server?
    (false) No
    (true) Yes

Type your choice []: false
Split reads to a different server?
    (false) Disabled
    (true) Enabled

Type your choice [false]:
Should Horde log all queries. If selected, queries will be logged at the DEBUG level to your configured logger.
    (1) Yes
    (0) No

Type your choice [0]:

Writing main configuration file. done.

Creating and updating database tables. done.

Configuring administrator settings

Specify an existing mail user who you want to give administrator permissions (optional):

Writing main configuration file. done.

Thank you for using Horde Groupware Webmail Edition!
5.访问登录页面
http://127.0.0.1/horde/login.php
这里不能使用localhost,会报错提示:
A fatal error has occurred
Session cookies will not work without a FQDN and with a non-empty cookie domain. Either use a fully qualified domain name like "http://www.example.com" instead of "http://example" only, or set the cookie domain in the Horde configuration to an empty value, or enable non-cookie (url-based) sessions in the Horde configuration.
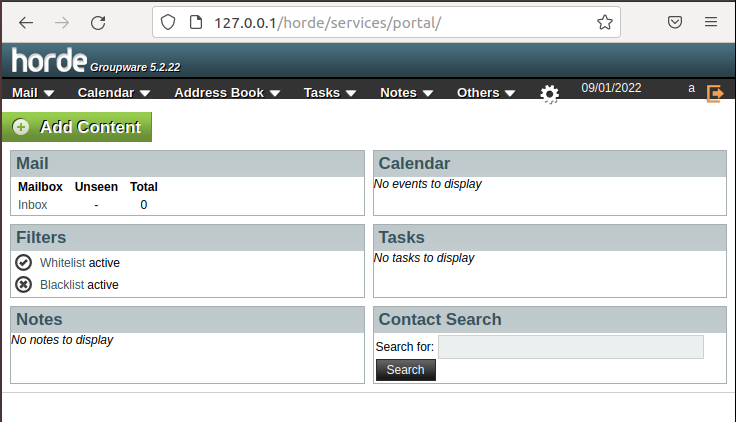
此时没有配置邮箱用户,无法进行登录,需要安装Dovecot
6.安装Dovecot
安装命令:apt-get -y install dovecot-imapd dovecot-pop3d
默认horde webmail没有配置邮箱用户,可以使用Ubuntu系统的用户进行登录,成功,如下图
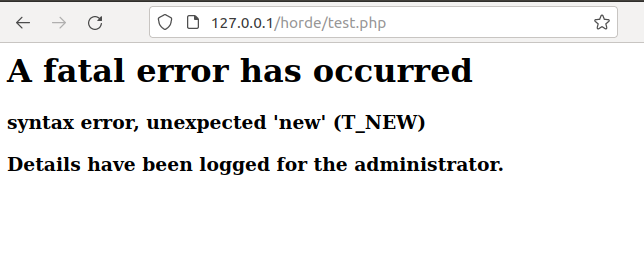
补充1:安装File_Fstab会出现bug
安装命令:pear install File_Fstab
安装这个模块之后,无法加载test页面,报错提示:
A fatal error has occurred
syntax error, unexpected 'new' (T_NEW)
Details have been logged for the administrator.
如下图
补充2:cpanel默认支持Horde Groupware Webmail
cpanel的安装可参考:https://docs.cpanel.net/installation-guide/system-requirements-centos/
cpanel下启用Horde Groupware Webmail的方法如下:
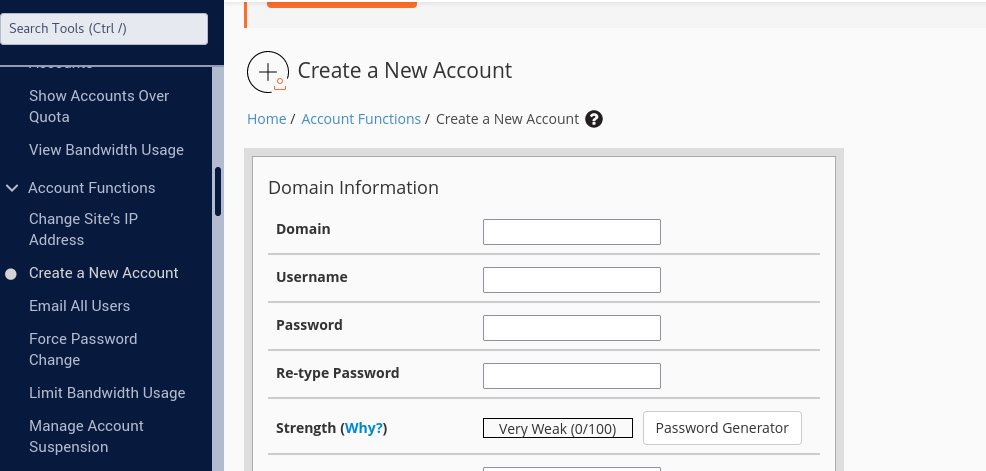
(1)添加邮箱账户
访问:http://<cpanel ip>:2087/
进入WHM,登录用户名root,口令为root用户的口令,选择创建用户,如下图
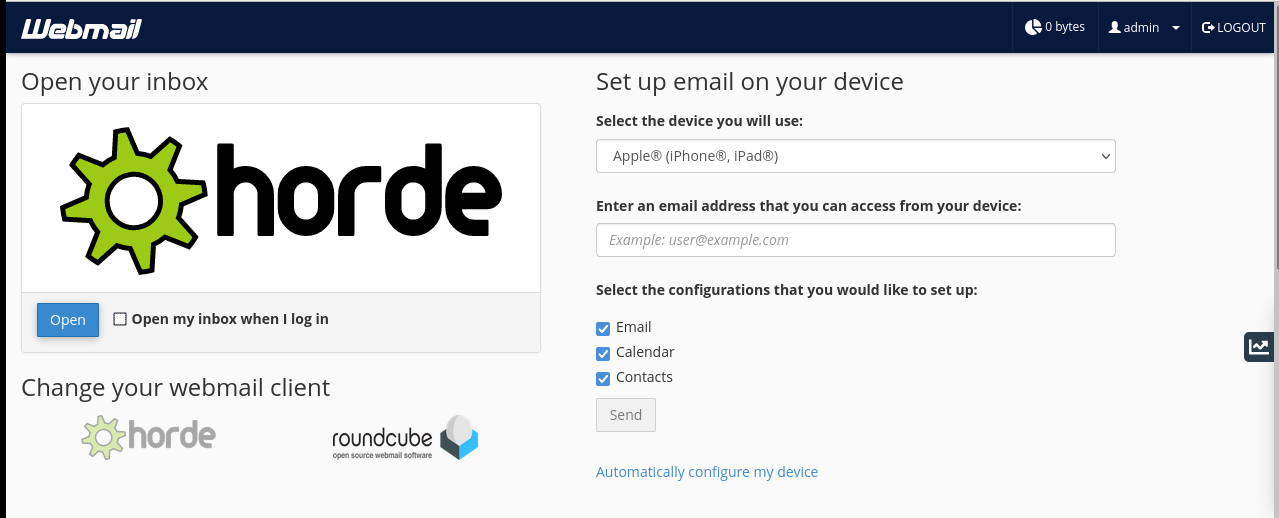
(2)选择horde
访问:http://<cpanel ip>:2096/
使用新添加的账户登录,选择Email Accounts,配置成horde,如下图
0x03 Horde Groupware Webmail漏洞调试环境配置
这里需要先在安装Horde Groupware Webmail的Ubuntu18上添加xdebug,然后在本地安装PhpStorm进行远程调试
本地系统使用Windows,IP为192.168.112.131
安装Horde Groupware Webmail的Ubuntu18 IP为192.168.112.168
流程如下:
1.安装xdebug
需要根据php版本选择合适的xdebug,可选择以下两种筛选方法:
(1)命令行执行命令php -i
(2)浏览器访问phpinfo页面
echo "<?php phpinfo();?>" > /usr/share/horde/phpinfo.php
访问http://127.0.0.1/horde/phpinfo.php
将以上方法得到的输出信息复制到https://xdebug.org/wizard,可以自动解析出对应的xdebug版本
根据提示进行安装
输出信息如下:
PHP版本: 7.2.24-0
下载安装xdebug:
wget https://xdebug.org/files/xdebug-3.1.5.tgz
apt-get install php-dev autoconf automake
tar -xvzf xdebug-3.1.5.tgz
cd xdebug-3.1.5
phpize
./configure
make
cp modules/xdebug.so /usr/lib/php/20170718
配置xdebug:vi /etc/php/7.2/apache2/conf.d/99-xdebug.ini
配置代码需要区分XDebug2和XDebug3,自PhpStorm 2020.3起,开始使用XDebug3,语法也做了更改,详细说明:https://xdebug.org/docs/upgrade_guide#changed-xdebug.remote_enable
正确的参数:
zend_extension = /usr/lib/php/20170718/xdebug.so
xdebug.mode=debug
xdebug.idekey=PHPSTORM
xdebug.start_with_request=yes
xdebug.client_host=192.168.112.131
xdebug.client_port=9000
xdebug.log='/tmp/xdebug.log'
对应老的参数(失效):
zend_extension = /usr/lib/php/20170718/xdebug.so
xdebug.mode=debug
xdebug.idekey=PHPSTORM
xdebug.remote_enable=1
xdebug.remote_host=192.168.112.131
xdebug.remote_port=9000
xdebug.remote_handler=dbgp
xdebug.remote_log='/tmp/xdebug.log'
重启Apache服务:sudo systemctl restart apache2.service
可通过访问phpinfo页面确认xdebug是否配置成功
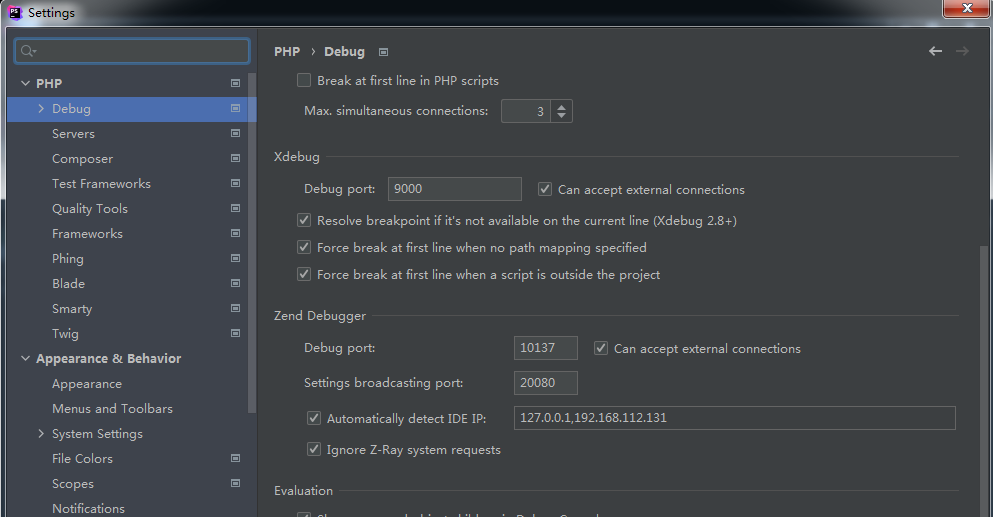
2.PhpStorm配置
(1)安装PhpStorm
(2)配置调试端口
打开PhpStorm,创建一个PHP Empty Project
依次打开File -> Settings -> PHP -> Debug
确认调试端口为9000,如下图
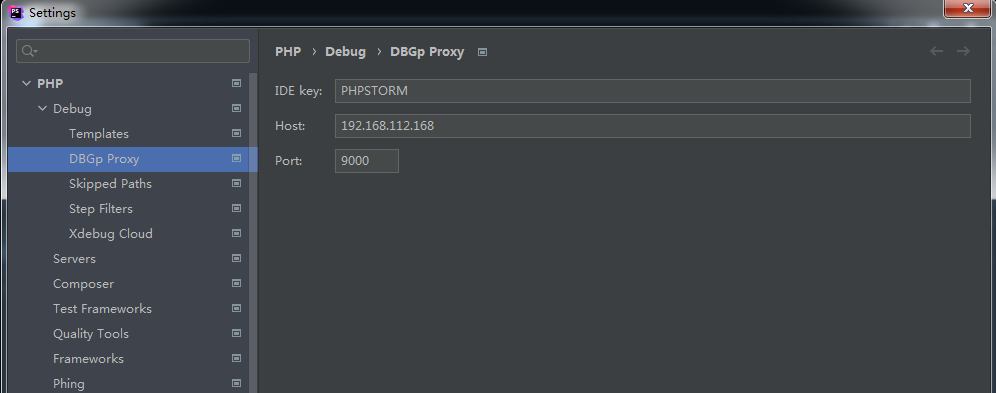
(3)配置DBGp Proxy
依次打开File -> Settings -> PHP -> Debug -> DBGp Proxy,填入以下信息:
IDE key: 	PHPSTORM
Host: 	 	192.168.112.168
Port: 		9000
如下图
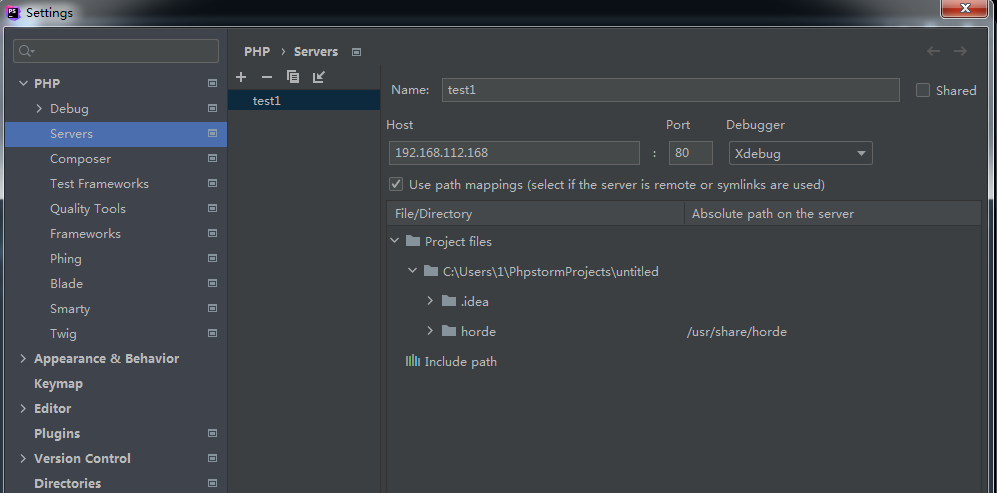
(4)配置Servers
依次打开File -> Settings -> PHP -> Servers
手动添加一个,填入以下信息:
Name:		test1
Host: 	 	192.168.112.168
Port: 		80
Debugger:	Xdebug
勾选Use path mappings,填入以下配置信息:
File/Directory:					c:\Users\1\PhpstormProjects\untitiled\horde
Absolute path on the server:	/usr/share/horde
如下图
3.下断点
将Ubuntu18的文件夹/usr/share/horde下载到本地,保存为c:\Users\1\PhpstormProjects\untitiled\horde
在PhpStorm打开需要调试的php文件并下断点
4.开始调试
(1)配置
依次打开Run -> Edit Configurations
手动添加一个,选择PHP Web Page,填入以下信息:
Name:		horde
Server:		test1
Start URL:	http://192.168.112.168/horde/login.php
Browser:	Chrome
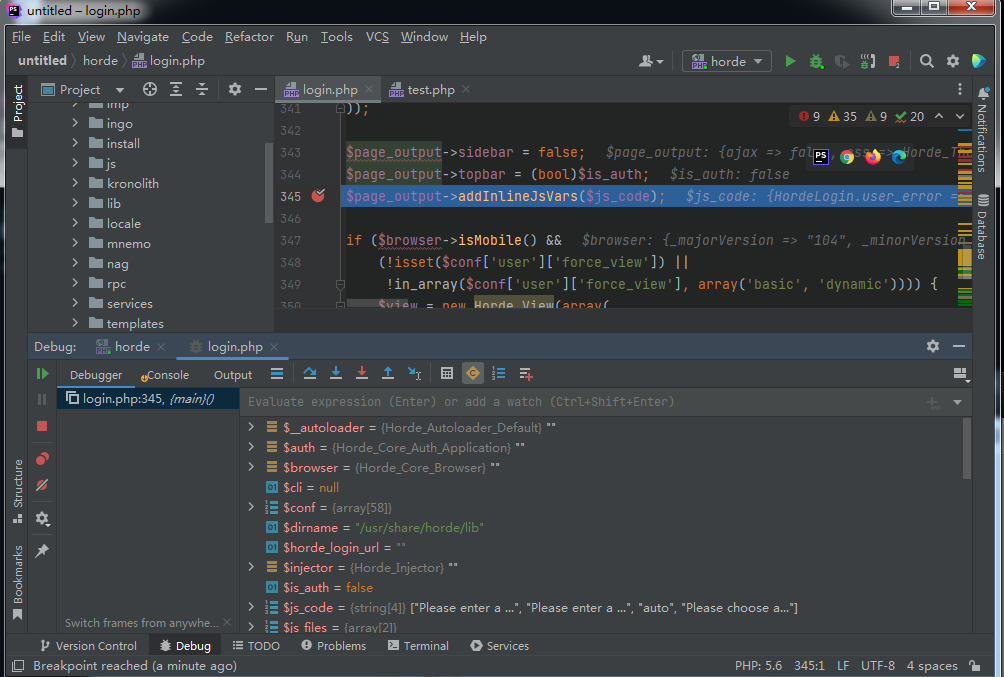
(2)开启监听
依次打开Run -> Start Listening for PHP Debug Connections
(3)开启调试
依次打开Run -> Debug
弹出Chrome浏览器,捕获到断点,如下图
0x04 常用知识
1.添加管理员用户
将用户a设置为管理员用户
vi /usr/share/horde/config/conf.php
修改:$conf['auth']['admins'] = array();
设置为:$conf['auth']['admins'] = array('a');
2.日志位置
/var/log/apache2/access.log
0x05 小结
在我们搭建好Horde Groupware Webmail漏洞调试环境后,接下来就可以着手对漏洞进行学习。