Sophos XG漏洞调试环境搭建
0x00 前言
Sophos UTM和Sophos XG是两款不同的产品,前者偏向于通用威胁管理,后者偏向于硬件防火墙。本文将要介绍Sophos XG漏洞调试环境的搭建方法。
0x01 简介
本文将要介绍以下内容:
- 环境搭建
- jetty调试环境搭建
- csc配置文件解密
- Postgresql数据库查询
0x02 基础知识
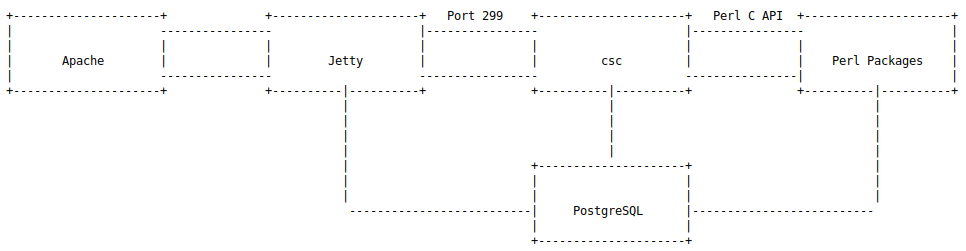
架构如下图
注:
图片引用自https://codewhitesec.blogspot.com/2020/07/sophos-xg-tale-of-unfortunate-re.html
总的来说,分为以下三部分:
- Jetty:处理Web数据,将数据转发至csc作进一步处理
- csc:主程序:加载Perl Packages,实现主要功能
- Postgresql:用来存储数据
我在实际研究过程中,这三部分遇到了以下问题:
- Jetty:添加调试信息后无法启动java
- csc:csc加载Perl Packages后会自动删除,无法获得Perl Packages的实现细节
- Postgresql:用户权限低,无法查询数据库表
下面将要逐个介绍三个问题的解决方法
0x03 环境搭建
参考资料:
https://docs.sophos.com/nsg/sophos-firewall/18.5/Help/en-us/webhelp/onlinehelp/VirtualAndSoftwareAppliancesHelp/VMware/VMwareInstall/index.html
1.下载安装包
官方网站默认只提供最新版本的下载,但是可以通过猜测正确的版本号下载旧版本
例如18.5.3 Virtual Installers: Firewall OS for VMware: https://download.sophos.com/network/SophosFirewall/installers/VI-18.5.3_MR-3.VMW-408.zip
18.5.2 Virtual Installers: Firewall OS for VMware: https://download.sophos.com/network/SophosFirewall/installers/VI-18.5.2_MR-2.VMW-380.zip
2.导入VMware Workstation
下载得到zip文件,解压后运行sf_virtual.ovf
3.VMware Workstation网卡配置
需要添加两个网卡VMnet7和VMnet8,VMnet7设置为Host-only和172.16.16.0,VMnet8设置为NAT,具体方法如下:
(1)VMnet7
打开VMware Workstation,依次选择Edit->Virtual Network Editor...
Add Network...->VMnet7
VMnet7设置为:
- Type: Host-only
- Subnet Address: 172.16.16.0
(2)VMnet8
VMnet8设置为:
- Type: NAT
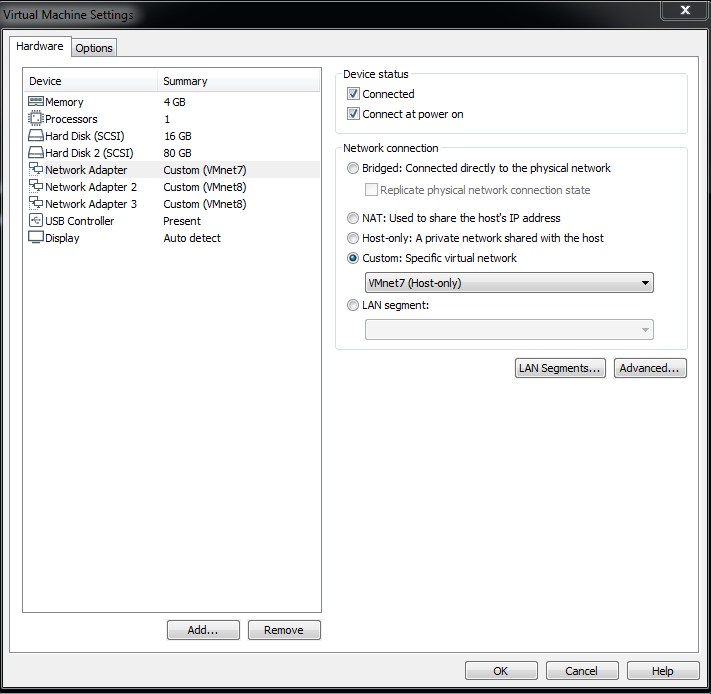
4.Sophos XG网卡配置
Network Adapter设置为VMnet7
Network Adapter 2设置为VMnet8
Network Adapter 3设置为VMnet8
配置如下图
5.启动Sophos XG
默认登录口令:admin
6.查看IP地址
依次输入1.Newwork Configuration->1.Interface Configuration
得到LAN的ip为172.16.16.16
7.进入Web配置页面进行激活
浏览器访问https://172.16.16.16:4444
注册页面选择:I don't have a serial number(start a trial)
按照提示进行注册
注册成功后,重新访问https://172.16.16.16:4444进行配置
0x04 jetty调试环境搭建
1.查看Java进程相关信息
执行命令:ps ww|grep java
输出:
java 3238 923 root 1393m 264m S /lib/jvm/java-11-openjdk/bin/java -Xmx384m -Xms12m -Xss256k -XX:MaxMetaspaceSize=100m -Dhybrid.enabled=false -Djna.tmpdir=/tmp/java -Djava.io.tmpdir=/tmp/java -Dsun.jnu.encoding=UTF-8 -Dfile.encoding=UTF-8 -Djava.awt.headless=true -Djetty.home=/usr/share/jetty -Djetty.base=/usr/share/jetty -jar /usr/share/jetty/start.jar --lib=/usr/share/webconsole/properties/
从输出中得到Java版本为java-11-openjdk
2.定位配置文件
配置文件路径为/usr/bin/jetty,内容如下:
#!/bin/sh

if   [ "${RAM}" == "2GB" ]; then
        heap_size=256
elif [ "${RAM}" == "4GB" ]; then
        heap_size=384
else
        heap_size=512
fi

HYBRID_ENABLED=false

if [ $HYBRID_ENABLED = true ]; then
    HYBRID_ENABLED=`opcode gethainfo -s nosync | grep -q "hamode=1" && echo "true" || echo "false"`
fi
if [ ! -d /tmp/java ]; then
    mkdir /tmp/java
fi
/scripts/umnt_mount_dir.sh "JVM" "/tmp/java" "mount"

##
# sun.jnu.encoding=UTF-8 - System property is required with file.encoding otherwise some java APIs unable to read file having double byte characters in file name.
##
exec /lib/jvm/java-11-openjdk/bin/java -Xmx${heap_size}m -Xms12m -Xss256k "-XX:MaxMetaspaceSize=100m" "-Dhybrid.enabled=${HYBRID_ENABLED}" "-Djna.tmpdir=/tmp/java" "-Djava.io.tmpdir=/tmp/java" "-Dsun.jnu.encoding=UTF-8" "-Dfile.encoding=UTF-8" "-Djava.awt.headless=true" "-Djetty.home=/usr/share/jetty" "-Djetty.base=/usr/share/jetty" -jar /usr/share/jetty/start.jar "--lib=/usr/share/webconsole/properties/"
/scripts/umnt_mount_dir.sh "JVM" "/tmp/java"
exit $?
3.添加调试参数
修改文件属性:mount -o rw,remount /
在exec所在行添加调试参数:"-agentlib:jdwp=transport=dt_socket,server=y,suspend=n,address=*:8000"
4.重启服务
执行命令:service tomcat:restart -ds nosync
查看服务状态:service -S | grep tomcat
发现tomcat状态为STOPPED
为了获得详细的报错信息,直接运行/usr/bin/jetty
输出:
Error occurred during initialization of VM
Could not find agent library jdwp on the library path, with error: libjdwp.so: cannot open shared object file: No such file or directory
发现是JDK的问题,这里选择替换一个完整的JDK
5.替换JDK
下载jdk-11.0.15_linux-x64_bin.tar.gz并上传至Sophos XG
备份原文件夹:cp -r /lib/jvm/java-11-openjdk /lib/jvm/java-11-openjdk_backup
将jdk-11.0.15_linux-x64_bin.tar.gz解压:tar zxvf /tmp/jdk-11.0.15_linux-x64_bin.tar.gz
替换/lib/jvm/java-11-openjdk:
rm -rf /lib/jvm/java-11-openjdk
cp -r /tmp/jdk-11.0.15 /lib/jvm/java-11-openjdk
6.再次重启服务
执行命令:service tomcat:restart -ds nosync
查看服务状态:service -S | grep tomcat
发现tomcat状态为RUNNING
确认参数被修改,执行命令:ps ww|grep java
输出:
java 1827 923 root 1454m 158m S /lib/jvm/java-11-openjdk/bin/java -Xmx384m -Xms12m -Xss256k -XX:MaxMetaspaceSize=100m -Dhybrid.enabled=false -Djna.tmpdir=/tmp/java -agentlib:jdwp=transport=dt_socket,server=y,suspend=n,address=*:8000 -Djava.io.tmpdir=/tmp/java -Dsun.jnu.encoding=UTF-8 -Dfile.encoding=UTF-8 -Djava.awt.headless=true -Djetty.home=/usr/share/jetty -Djetty.base=/usr/share/jetty -jar /usr/share/jetty/start.jar --lib=/usr/share/webconsole/properties/
7.修改防火墙规则
执行命令:iptables -I INPUT -p tcp --dport 8000 -j ACCEPT
8.使用IDEA远程调试
如下图
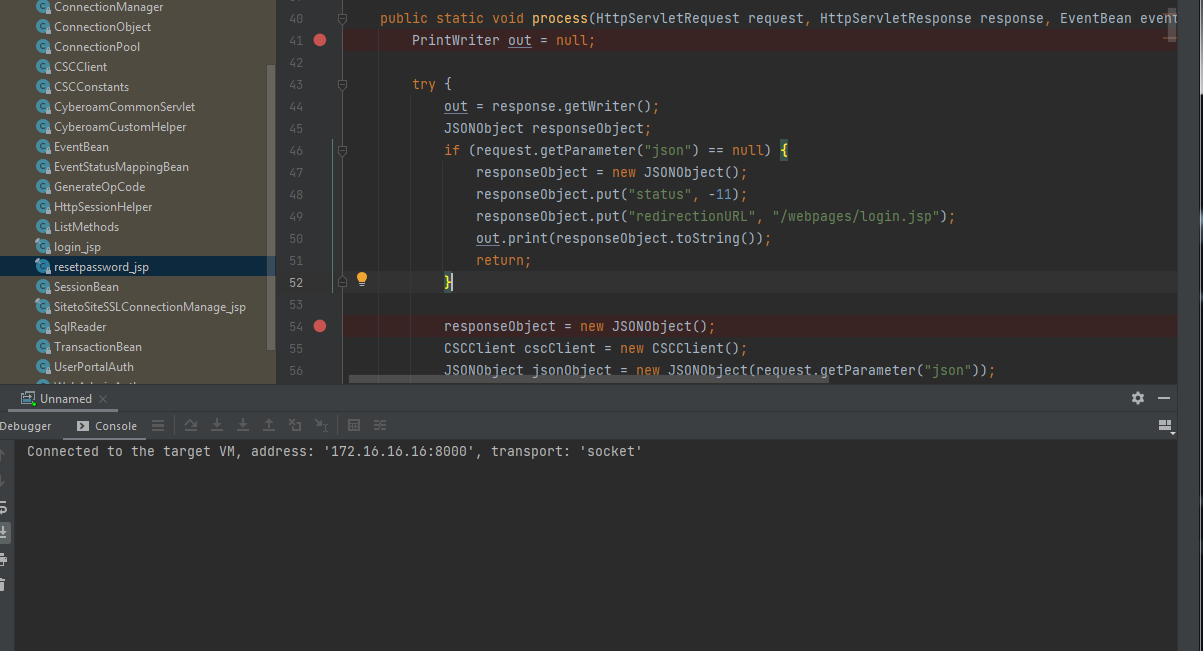
在调试过程中,如果遇到无法下断点的情况,重启java服务即可:service tomcat:restart -ds nosync
0x05 csc配置文件解密
查看csc进程相关信息
执行命令:ps ww|grep csc
部分输出:
csc               859     1 root     25916 23600 S    csc -L 3 -w -c /_conf/cscconf.bin
csc               869   859 root      8628   452 S    csc -L 3 -w -c /_conf/cscconf.bin
cfs               870   859 root     34736 29380 S    {cfs} csc -L 3 -w -c /_conf/cscconf.bin
listener          871   859 root     21752 15088 S    {listener} csc -L 3 -w -c /_conf/cscconf.bin
lcdd              889   871 root     21108 13556 S    {lcdd} csc -L 3 -w -c /_conf/cscconf.bin
postgres          890   871 root     29712 25040 S    {postgres} csc -L 3 -w -c /_conf/cscconf.bin
sigdb             891   871 root     26756 23208 S    {sigdb} csc -L 3 -w -c /_conf/cscconf.bin
reportdb          892   871 root     26756 23104 S    {reportdb} csc -L 3 -w -c /_conf/cscconf.bin
awarrensmtp       893   871 root     25916 22296 S    {awarrensmtp} csc -L 3 -w -c /_conf/cscconf.bin
csc进程读取/_conf/cscconf.bin作为配置文件,而/_conf/cscconf.bin是一个加密的文件,所以这里需要对/_conf/cscconf.bin进行解密
这里我采用的方法是通过IDA修改程序代码,改变实现逻辑,导出解密后的配置文件
使用IDA加载csc,查看main()函数的实现逻辑,部分代码:
signed int __cdecl csc_main(int a1, char *const *a2)
{
  //****ignore code*****//
  if ( strlen(v14) > 4 )
  {
    v4 = strlen(v14);
    if ( !strcmp(&v14[v4 - 4], ".bin") )
    {
      extract_conf((int)v14);
      v17 = 1;
      v14 = "/_conf/csc/csc.conf";
    }
  }
  //****ignore code*****//
    if ( v17 )
      system(
        "rm -rf /_conf/csc/csc /_conf/csc/csc.conf /_conf/csc/cscconf/ /_conf/csc/constants.conf /_conf/csc/cscconf.tar.g"
        "z /_conf/csc/global.conf /_conf/csc/cfsconf /_conf/csc/service /_conf/csc/bind_file_list");
  //****ignore code*****//
}
分析以上代码,csc先调用extract_conf()函数导出配置,最后执行系统命令rm -rf /_conf/csc/csc /_conf/csc/csc.conf /_conf/csc/cscconf/ /_conf/csc/constants.conf /_conf/csc/cscconf.tar.gz /_conf/csc/global.conf /_conf/csc/cfsconf /_conf/csc/service /_conf/csc/bind_file_list删除配置文件,导致我们无法直接获得相关配置文件
查看extract_conf()函数的实现代码:
unsigned int __cdecl extract_conf(int a1)
{
  int v2; // [esp+18h] [ebp-10h]
  unsigned int v3; // [esp+1Ch] [ebp-Ch]

  v3 = __readgsdword(0x14u);
  system("mount --make-private /_conf/csc");
  if ( mount("none", "/_conf/csc", "tmpfs", 0, 0) )
  {
    puts("mount tmpfs failed");
    exit(70);
  }
  v2 = sub_8052494(a1, "/_conf/csc/cscconf.tar.gz");
  if ( v2 == -1 )
  {
    printf("Cannot read file %s\n", a1);
    exit(70);
  }
  if ( v2 == -2 )
  {
    printf("Cannot read file2  %s\n", a1);
    exit(70);
  }
  system("tar -zxf /_conf/csc/cscconf.tar.gz -C /_conf/csc");
  return __readgsdword(0x14u) ^ v3;
}
分析以上代码,csc先调用sub_8052494()函数对/_conf/csc/cscconf.tar.gz进行解密,接着执行系统命令tar -zxf /_conf/csc/cscconf.tar.gz -C /_conf/csc将配置文件释放到文件夹/_conf/csc
综合以上分析,我们可以采取以下方式导出配置文件:修改csc程序,将释放路径/_conf/csc修改为另一路径,例如/var/aaaaa,那么,csc在删除配置文件时,由于指定了固定的绝对路径,导致无法删除新的文件夹,这样我们就能从中获得完整的配置文件
具体的实现方法如下:
(1)修改csc
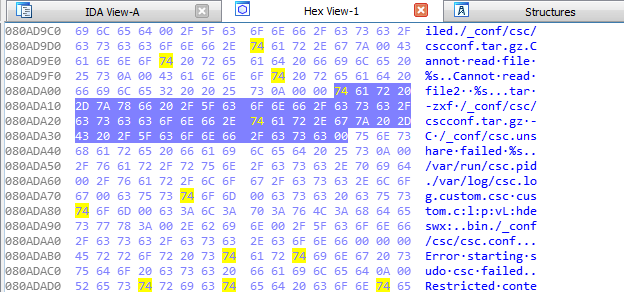
使用IDA加载csc,查看Exports,找到extract_conf,双击进入IDA View,定位到字符串tar -zxf /_conf/csc/cscconf.tar.gz -C /_conf/csc,如下图
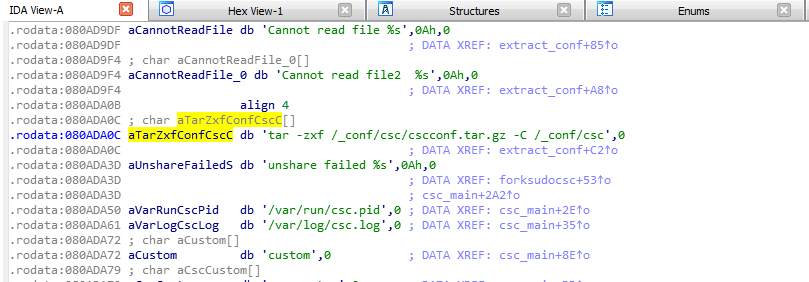
切换到Hex View,如下图
将/_conf/csc修改为/var/aaaaa,如下图
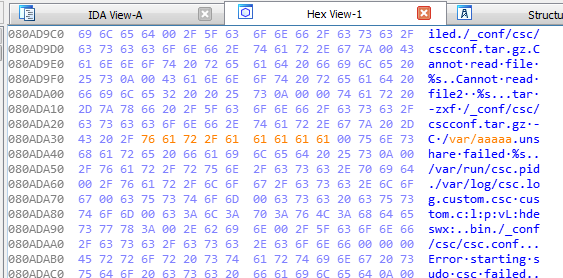
右键选择Apply changes
依次选择Edit->Patch program->Apply patches to input file...->OK,生成新的文件csc
(2)替换csc
通过ssh登录,上传新的文件csc,保存至/tmp/csc
备份csc并进行替换,执行以下命令:
mount -o rw,remount /
cp /usr/bin/csc /usr/bin/csc_original
mkdir /var/aaaaa
cp /tmp/csc /usr/bin/csc
chmod 755 /usr/bin/csc
ll /usr/bin/csc
reboot
(3)确认配置文件是否导出成功
等待系统重启,进入底层shell,依次输入5.Device Management->3.Advanced Shell
查看文件夹/var/aaaaa,如下图
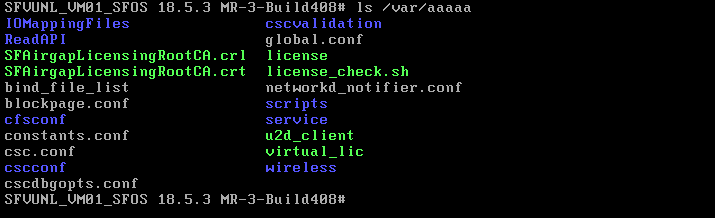
配置文件导出成功
(4)恢复csc
mount -o rw,remount /
cp /usr/bin/csc_original /usr/bin/csc
reboot
(5)下载配置文件
通过ssh登录,下载文件夹/var/aaaaa中的内容
0x06 Postgresql数据库查询
查看端口信息,执行命令:netstat -tulpen |grep postgres
输出:
tcp        0      0 127.0.0.1:5432          0.0.0.0:*               LISTEN      65534      3800       1087/postgres
tcp        0      0 127.0.0.1:5433          0.0.0.0:*               LISTEN      65534      5846       1182/postgres
tcp        0      0 127.0.0.1:5434          0.0.0.0:*               LISTEN      65534      5813       1161/postgres
通过搜索,发现以上三个数据库的连接信息依次对应以下三个文件:
- /usr/share/webconsole/properties/ConnectionPool.cfg
- /usr/share/webconsole/properties/ConnectionPoolForReports.cfg
- /usr/share/webconsole/properties/ConnectionPoolForSignature.cfg
文件中的配置信息如下:
- JDBCConnectionURL=jdbc:postgresql://127.0.0.1:5432/corporate?user=pgrouser&autoReconnect=true
- JDBCConnectionURL=jdbc:postgresql://127.0.0.1:5433/iviewdb?user=pgrouser&autoReconnect=true
- JDBCConnectionURL=jdbc:postgresql://127.0.0.1:5434/signature?user=pgrouser&autoReconnect=true
测试命令1:
psql -p 5432 corporate -U pgrouser
corporate=> \d
输出:
ERROR: permission denied for relation pg_class
提示没有权限
测试命令2:
psql -p 5432 corporate -U pgrouser
select * from tbluser;
能够获得用户信息
注:
将用户pgrouser换成nobody具体相同的权限
从以上信息得知,用户pgrouser和nobody都不是root用户,功能受限,下面尝试寻找root用户
对解密的csc配置文件进行检测,定位到\service\postgres.csc,关键文件内容:
EXEC /bin/synccmd "/sbin/pg_dump -U pgroot corporate -a --disable-triggers -t tblhavmac -f /tmp/corphavmac"
EXEC /bin/synccmd "/sbin/pg_dump -U pgroot corporate -a --disable-triggers -t tblinterface -t tblipaddress -f /tmp/corpifdb"
EXEC /bin/synccmd "/sbin/pg_dump -U pgroot corporate -a --disable-triggers -n config -T tbllivesslvpnusers -T tblhbcloudcredential -f /tmp/corpdb"
找到关键用户pgroot
测试命令3:
psql -U pgroot -d corporate
\d
执行成功
0x07 小结
本文介绍了在搭建Sophos XG调试环境过程中一些问题的解决方法。