Windows XML Event Log (EVTX)单条日志清除(一)——删除思路与实例
0x00 前言
Windows XML Event Log (EVTX)单条日志清除系列文章的第一篇,侧重于介绍evtx日志文件的基础知识和删除单条日志的实现思路与实例
0x01 简介
本文将要介绍以下内容:
- evtx文件格式
- 删除单条日志的思路
- 删除单条日志的实例
0x02 基础知识:evtx文件格式
可参考的资料:
https://github.com/williballenthin/python-evtx
evtx文件是指Windows Vista之后用于保存系统日志信息的文件
evtx文件结构包含三部分:
- file header
- chunks
- trailing empty values
注:
file header保存evtx文件基本信息,值得注意的是Next record identifier、Number of chunks、File flags和Checksum
chunks保存日志内容,包括具体每条日志的内容和校验和,值得注意的是Last event record number、Last event record identifier、Last event record data offset和两个Checksum
trailing empty values为尾随空值,用于填充文件长度,内容任意,不会影响evtx文件的有效性
(1) file header
格式可参考:
https://github.com/libyal/libevtx/blob/master/documentation/Windows%20XML%20Event%20Log%20(EVTX).asciidoc#2-file-header
(2) chunks
格式可参考:
https://github.com/libyal/libevtx/blob/master/documentation/Windows%20XML%20Event%20Log%20(EVTX).asciidoc#3-chunk
chunks包含多个Event Record,1个Event Record对应一条日志信息
(3) Event Record
格式可参考:
https://github.com/libyal/libevtx/blob/master/documentation/Windows%20XML%20Event%20Log%20(EVTX).asciidoc#32-event-record
Event Record的内容以Binary XML格式保存
Binary XML格式可参考:
https://github.com/libyal/libevtx/blob/master/documentation/Windows%20XML%20Event%20Log%20(EVTX).asciidoc#4-binary-xml
值得注意的是EventRecordID标签,用来表示日志的顺序号
实例演示:
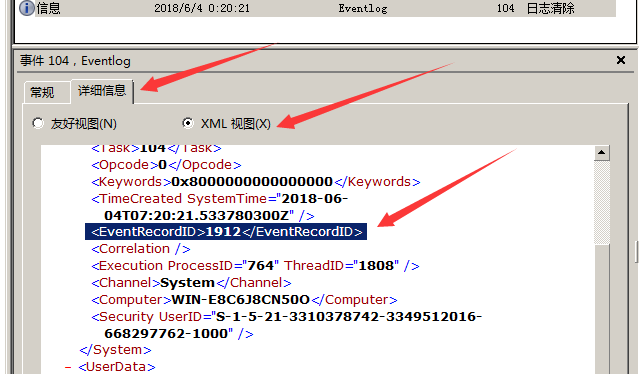
1、通过Windows日志查看
查看事件日志,选中一条日志,选择详细信息->XML视图
如下图
2、通过python脚本查看
安装python-evtx:
pip install python-evtx
下载脚本:
https://github.com/williballenthin/python-evtx/blob/master/scripts/evtx_record_structure.py
命令如下:
evtx_record_structure.py System.evtx 1915
回显如下:
00000000: 2A 2A 00 00 38 01 00 00 7B 07 00 00 00 00 00 00 **..8...{.......
00000010: 23 EB 07 A2 D4 FB D3 01 0F 01 01 00 0C 01 65 CE #.............e.
00000020: 1B C7 EE 0D 00 00 14 00 00 00 01 00 04 00 01 00 ................
00000030: 04 00 02 00 06 00 02 00 06 00 02 00 06 00 08 00 ................
00000040: 15 00 08 00 11 00 00 00 00 00 04 00 08 00 04 00 ................
00000050: 08 00 08 00 0A 00 01 00 04 00 00 00 00 00 00 00 ................
00000060: 00 00 00 00 00 00 00 00 00 00 00 00 00 00 00 00 ................
00000070: 00 00 00 00 00 00 8B 00 21 00 04 00 00 00 7C 1B ........!.....|.
00000080: 00 40 00 00 00 00 00 00 80 80 23 EB 07 A2 D4 FB .@........#.....
00000090: D3 01 D8 01 00 00 9C 07 00 00 7B 07 00 00 00 00 ..........{.....
000000A0: 00 00 00 0F 01 01 00 0C 01 DE E1 DC 34 6C 11 00 ............4l..
000000B0: 00 04 00 00 00 4E 00 01 00 08 00 01 00 04 00 08 .....N..........
000000C0: 00 0E 00 0E 00 42 00 61 00 63 00 6B 00 67 00 72 .....B.a.c.k.g.r
000000D0: 00 6F 00 75 00 6E 00 64 00 20 00 49 00 6E 00 74 .o.u.n.d. .I.n.t
000000E0: 00 65 00 6C 00 6C 00 69 00 67 00 65 00 6E 00 74 .e.l.l.i.g.e.n.t
000000F0: 00 20 00 54 00 72 00 61 00 6E 00 73 00 66 00 65 . .T.r.a.n.s.f.e
00000100: 00 72 00 20 00 53 00 65 00 72 00 76 00 69 00 63 .r. .S.e.r.v.i.c
00000110: 00 65 00 63 6B 28 57 D0 8F 4C 88 0E 00 00 00 42 .e.ck(W..L.....B
00000120: 00 49 00 54 00 53 00 2F 00 34 00 00 00 00 00 00 .I.T.S./.4......
00000130: 15 00 00 00 38 01 00 00 ....8...
record(absolute_offset=8776)
RootNode(offset=0x18)
StreamStartNode(offset=0x18)
TemplateInstanceNode(offset=0x1c, resident=False)
Substitutions(offset=0x26)
UnsignedByteTypeNode(offset=0x7a) --> 4
UnsignedByteTypeNode(offset=0x7b) --> 0
UnsignedWordTypeNode(offset=0x7c) --> 0
UnsignedWordTypeNode(offset=0x7e) --> 7036
UnsignedWordTypeNode(offset=0x80) --> 16384
Hex64TypeNode(offset=0x82) --> 0x8080000000000000
FiletimeTypeNode(offset=0x8a) --> 2018-06-04 07:21:19.394281
NullTypeNode(offset=0x92)
UnsignedDwordTypeNode(offset=0x92) --> 472
UnsignedDwordTypeNode(offset=0x96) --> 1948
UnsignedQwordTypeNode(offset=0x9a) --> 1915
UnsignedByteTypeNode(offset=0xa2) --> 0
NullTypeNode(offset=0xa3)
NullTypeNode(offset=0xa3)
NullTypeNode(offset=0xa3)
NullTypeNode(offset=0xa3)
NullTypeNode(offset=0xa3)
NullTypeNode(offset=0xa3)
NullTypeNode(offset=0xa3)
BXmlTypeNode(offset=0xa3) -->
RootNode(offset=0xa3)
StreamStartNode(offset=0xa3)
TemplateInstanceNode(offset=0xa7, resident=False)
Substitutions(offset=0xb1)
WstringTypeNode(offset=0xc5) --> Background Intelligent Transfer Servi
ce
WstringTypeNode(offset=0x113) --> 正在运行
UnsignedDwordTypeNode(offset=0x11b) --> 14
BinaryTypeNode(offset=0x11f) --> QgBJAFQAUwAvADQAAAA=
<Event xmlns="http://schemas.microsoft.com/win/2004/08/events/event"><System><Pr
ovider Name="Service Control Manager" Guid="{555908d1-a6d7-4695-8e1e-26931d2012f
4}" EventSourceName="Service Control Manager"></Provider>
<EventID Qualifiers="16384">7036</EventID>
<Version>0</Version>
<Level>4</Level>
<Task>0</Task>
<Opcode>0</Opcode>
<Keywords>0x8080000000000000</Keywords>
<TimeCreated SystemTime="2018-06-04 07:21:19.394281"></TimeCreated>
<EventRecordID>1915</EventRecordID>
<Correlation ActivityID="" RelatedActivityID=""></Correlation>
<Execution ProcessID="472" ThreadID="1948"></Execution>
<Channel>System</Channel>
<Computer>WIN-E8C6J8CN50O</Computer>
<Security UserID=""></Security>
</System>
<EventData><Data Name="param1">Background Intelligent Transfer Service</Data>
<Data Name="param2">正在运行</Data>
<Binary>QgBJAFQAUwAvADQAAAA=</Binary>
</EventData>
</Event>
0x03 删除单条日志的思路
Windows系统在解析日志文件时,通过Event Record的Size长度逐个读取每一条日志的内容
如果修改某条日志的长度,使长度覆盖下一条日志,那么Windows系统在解析时,就会跳过下一条日志,相当于下一条日志被隐藏
DanderSpritz中的eventlogedit就是这个思路,只修改了长度,没有删除日志内容
实现思路如下图
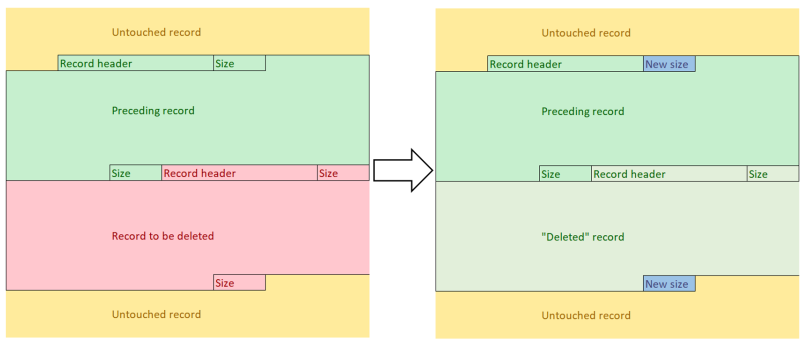
注:
图片来自https://blog.fox-it.com/2017/12/08/detection-and-recovery-of-nsas-covered-up-tracks/
所以如果恢复每条日志的正确日志长度,就能够恢复出被隐藏的日志,恢复工具可使用如下python脚本:
https://github.com/fox-it/danderspritz-evtx
当然,如果以此为基础,把指定日志的内容清空,就能够实现真正的日志删除
为了保证修改后的日志文件能够被正确识别,还需要修改多个标志位,重新计算校验和
具体修改方法如下:
- File header中的Next record identifier值减1
- 重新计算File header中的Checksum
- 修改Event Record:重新计算待删除Event Record前后长度,更新后续Event Record的Event record identifier
- 更新ElfChuk,修改如下内容:
- Last event record number
- Last event record identifier
- Last event record data offset
- Event records checksum
- Checksum
0x04 删除单条日志的实例
测试文件: System.evtx
下载地址:
https://github.com/3gstudent/Eventlogedit-evtx--Evolution/blob/master/System.evtx
文件包含4条日志,下面演示如何删除第4条日志
第4条日志内容如下图
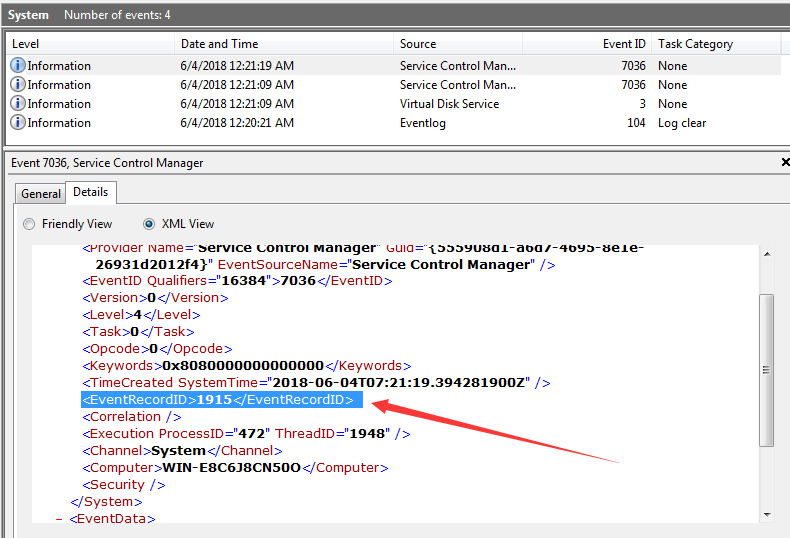
EventRecordID为1915
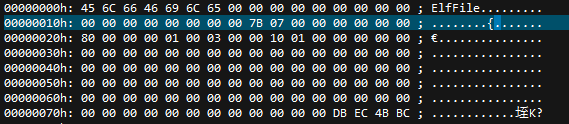
1、File header中的Next record identifier值减1
File header位于文件最开始的部分
Next record identifier的偏移为24(0x18h),长度8
对应测试文件System.evtx,如下图
Next record identifier为0x77Ch,即1916
减1后为1915,即0x77Bh
2、重新计算File header中的Checksum
计算方法: 前120字节做CRC32运算,偏移为124(0x7Ch),长度4
修改Next record identifier后的内容如下图
前120字节的内容为456C6646696C6500000000000000000000000000000000007B0700000000000080000000010003000010010000000000000000000000000000000000000000000000000000000000000000000000000000000000000000000000000000000000000000000000000000000000000000000000000000000000
计算CRC32可使用如下python代码:
import binascii
def crc2hex(crc):
    return '%08x' % (binascii.crc32(binascii.a2b_hex(crc)) & 0xffffffff)
d='456C6646696C6500000000000000000000000000000000007B0700000000000080000000010003000010010000000000000000000000000000000000000000000000000000000000000000000000000000000000000000000000000000000000000000000000000000000000000000000000000000000000'
print(crc2hex(d))
输出结果ccc94756
所以更新后的内容为56 47 C9 CC,如下图

3、修改Event Record
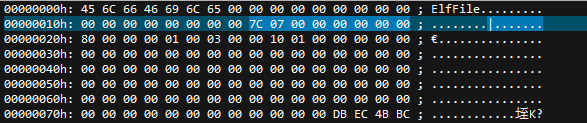
通过搜索magic string 0x2A 0x2A 0x00 0x00定位不同的Event Record
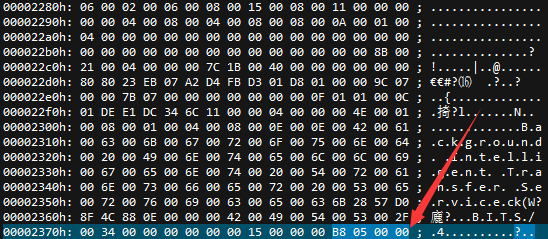
第四条Event Record的内容如下图
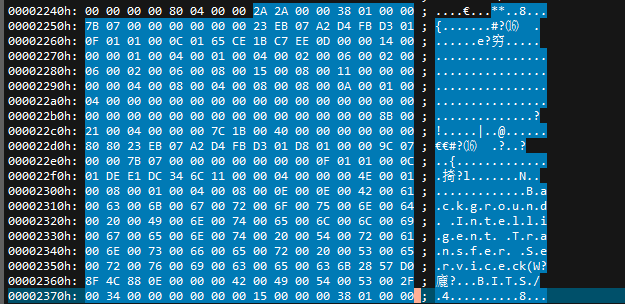
长度为0x138h
Event record identifier为0x77Bh
第三条Event Record的内容如下图
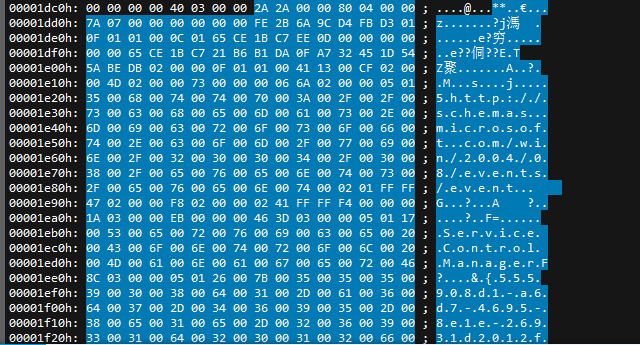
长度为0x480h
Event record identifier为0x77Ah
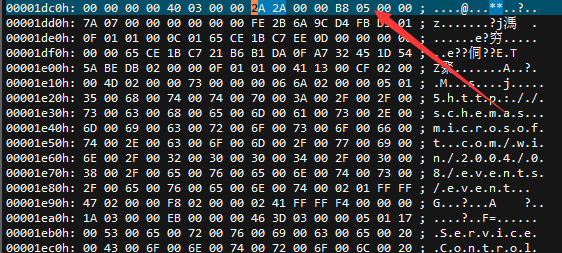
修改第三条Event Record的长度,使其覆盖第四条Event Record
新长度为0x138h+0x480h=0x5B8h
由于是删除最后一条日志,所以不需要更新Event record identifier(共有两个位置)
注:
修改长度的位置有两个,分别为第三条日志的长度和第四条日志的最尾部
修改后如下图
注:
本次测试只修改了Event Record的长度,后续可通过修复长度还原日志
当然可以选择将日志内容清空,实现永久删除
4、更新ElfChuk
搜索magic string ElfChuk
注:
有可能有多个ElfChuk,需要找到对应的ElfChuk
测试文件System.evtx只有一个ElfChuk
内容如下图
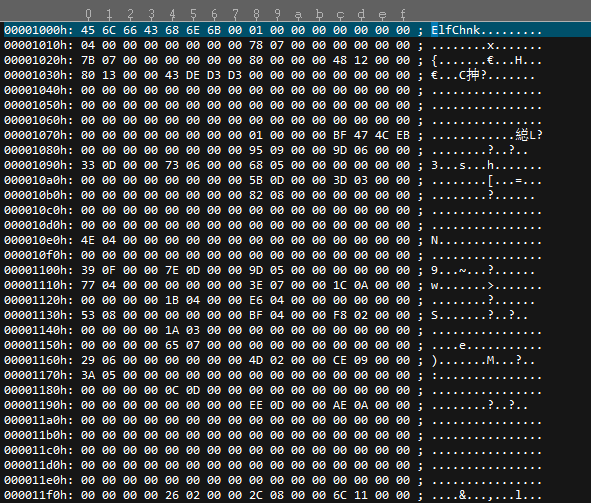
Last event record number为0x4h
Last event record identifier为0x77Bh
Last event record data offset为0x1248h
Event records checksum为0xD3D3DE43h
Checksum为0xEB4C47BFh
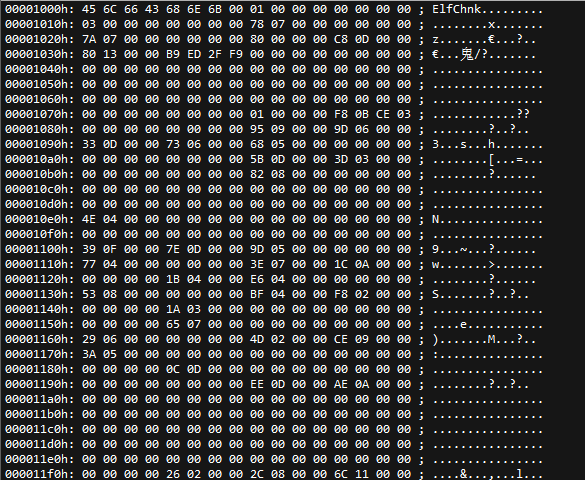
需要做如下修改:
Last event record number减1,为0x3h
Last event record identifier减1,为0x77Ah
Last event record data offset为第三条Event Record相对于ElfChuk的偏移长度,为0xDC8h
Event records checksum为所有Event records内容的CRC32校验和,包含3条日志内容,使用python脚本计算后,结果为0xF92FEDB9h
Checksum为ElfChuk中0-120和128-512这些内容的CRC32校验和,结果为0x3CE0BF8h
更新后,内容如下图
保存为新文件System2.evtx
下载地址:
https://github.com/3gstudent/Eventlogedit-evtx--Evolution/blob/master/System2.evtx
注:
为了验证trailing empty values,我将第四条日志后的内容全部覆盖为0x41(字符A),不影响日志文件的有效性
System2.evtx被成功识别,如下图

0x05 小结
本文介绍了基础知识和删除单条日志的实现思路,实例演示如何修改evtx文件,隐藏最后一条日志
下一篇将要介绍如何编写程序实现自动删除指定日志